Table of Contents
Overview
Cloud Foundry is an open source Platform as a Service (PaaS) technology. Many organisations and cloud providers collaborate within the Cloud Foundry Foundation which governs the product development. Multiple PaaS providers offer cloud services based on Cloud Foundry. This allows for “portbale” applications which are based on open standards and can be easily migrated across clouds.
In this post, we will overview the main concepts and building blocks in Cloud Foundry. We will also provide a cheatsheet of Cloud Foundry commands, so if you haven’t done so go and set up the Cloud Foundry Cli.
We will focus on basic concepts like organisations, spaces, apps, buildpacks, and services. In the future, we will look into more advanced features like boilerplates, toolchains, autoscaling, and others.
Endpoints and Authentication
The Cloud Foundry Cli can connect to and manage any compliant Cloud Foundry installation. Hence, before we proceed we need to specify the endpoint we want work with. The Cli will remember and use it until we specify another endpoint. We will also need to authenticate:
1
2
3
4
5
6
7
8
9
10
# Sets the Cli endpoint - in this example Bluemix
# Does not authenticate!
cf api https://api.ng.bluemix.net

# Authenticates to the previously specified endpoint.
# Will ask for user/password
cf login

# Or we can set endpoint and authenticate at once:
cf login -a https://api.ng.bluemix.net
Organisations and Spaces
In Cloud Foundry, an organisation represents an organisational account and groups together users, resources, applications, and environments. Each organisation has a resource quota and is billed separately. For example, a startup company may have a single Cloud Foundry organisation, while a bigger enterprise would typically have multiple in order to monitor and control expenses and resource consumption. Within an enterprise, separate organisations may be assigned to individual lines of buisiness (LOB) or divisions.
An organisation is further subdivided into spaces, which represent siloed application environments. For example, an organisation may have spaces for staging and production. All used resources within a space contribute towards its organisation’s quota. A space can also have its own quota. In this case, its resource consumption is counted towards both its own quota and the quota of the parent organisation. This is handy when we need to ensure that a space (e.g. “staging”) does not use too many resources and leaves enough for another space (e.g. “prod”).
Individual users are assigned roles which allow them to access and administrate organisations and spaces. Here is a list of what roles can be assigned.
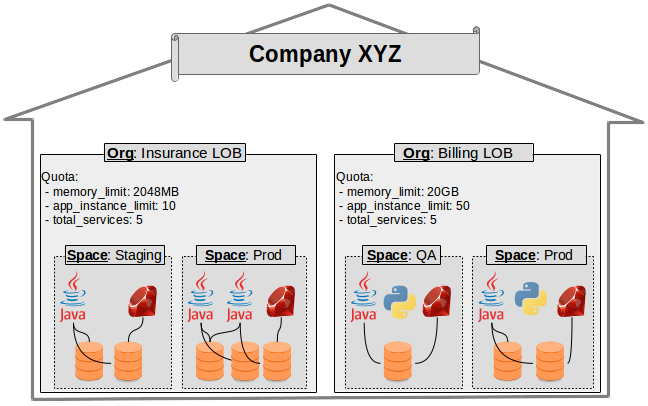
The following diagram depicts a fictitious company with two Cloud Foundry organisations - one for each of its 2 lines of business (LOB). Each organisation has a resource quota and two spaces, which host the applications. In this example, the spaces do not have their own quotas.

Here is how we can work with organisations and spaces:
1
2
3
4
5
6
7
8
9
10
11
12
13
14
15
16
17
18
19
20
21
# Check current organisation and space
cf target

# List all orgs we have access to
cf orgs

# List all spaces in the current org
cf spaces

# Change current organisation or/and space
cf target -o [org-name] -s [space-name]

# Check the available quotas - i.e. plans
cf quotas

# Check the quota for a given org
cf org [org-name]

# Check the quota for a given space
# in the current organisation
cf space [space-name]
We can also create custom quotas/plans with the quota specific commands, which we won’t cover here.
Applications
Apps, Routes, Domains, and Buildpacks
In Cloud Foundry, an application is an abstraction of one or several identical servers called instances which run the same code. These instances follow a template called buildpack. A buildpack provides framework and runtime support - e.g. a preconfigured Java Web server. A buiildpack defines the server configuration and setup and we just need to push code which can be run in such an environment.
Cloud Foundry comes with a number of system buildpacks for commonly used frameworks - Node.js, Rails, Sinatra, .Net core and more. There are also many community buildpacks and a procedure for creating custom buildpacks.
When creating a new application, we can explicitly specify its buildpack. If no builpack is provided, Cloud Foundry will try to guess which one to use, which can lead to an error if there are multiple matching buildpacks.
We mentioned that an app can have multiple servers/instances. So how do we make them appear as a single instance to the developer and the end user? In a typical IaaS environment, we would add a load balancer “in front of them” to route all the traffic across the instances. The Cloud Foundry approach to this is to use the so-called route, which is an address associated with an application. Routing is how incoming traffic is distributed across application instances. Under the hood, Cloud Foundry takes care of the details - e.g. load balancing, web sockets, sticky sessions, and caching.
Every organisation has one or several domains.
Each route’s addresses within an organisation should fall within one of these
domains. For example, if a route has address myapp.route.com, then there
must be a domain route.com in its organisation.
Applications which are not accessed online (e.g. background batch processing jobs) do not need routes.
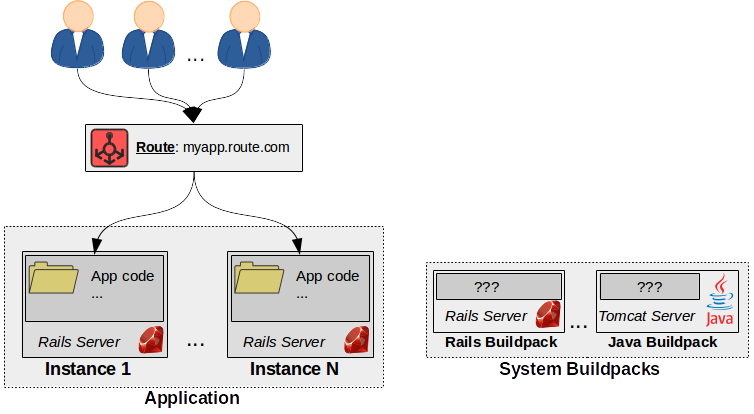
The following diagram depicts a Rails application which has several
instances. It is associated with the route myapp.route.com and the incoming
traffic is distributed among its instances. The application is based on a predefined
system buildpack for Rails.

Here’s how we can work with apps, buildpacks, and routes:
1
2
3
4
5
6
7
8
9
10
11
12
13
14
15
16
17
18
19
20
21
22
23
24
25
26
27
28
29
30
31
32
# List all apps in the space
cf apps

# Details for a specific app
cf app [app-name]

# List all predefined buildpacks
cf builpacks

# List all domains in the organisation
cf domains

# Creates the "route.com" domain and all
# of its routes in the current org
cf create-domain [org-name] route.com

# Remove the "route.com" domain
cf delete-domain route.com

# List all routes in the space
cf routes

# Create a new route: "myapp.route.com"
cf create-route [space-name] route.com --hostname myapp

# Map "myapp.route.com" to an app.
# Creates the route if not present
cf map-route [app-name] route.com -n myapp

# Unmap "myapp.route.com" from an app.
# Creates the route if not present
cf unmap-route [app-name] route.com -n myapp
Application Management
To deploy a new app or update an existing one we need to push its code to
the Cloud Foundry instance. The push command has many optional arguements
which depend on the application type. However, it’s better to
specify all these arguements in a system file called manifest.yml, which
is a special file for Cloud Foundry.
1
2
3
4
# Start a new app called "myapp"
# If there's a manifest.yml in the current folder,
# the config will be read from there
cf push
The documentation for manifest.yml is quite comprehensive. Here’s a sample file:
1
2
3
4
5
6
7
8
---
- name: myNodejsapp
  memory: 256M
  disk_quota: 512M
  buildpack: nodejs_buildpack
  host: my-new-nodejsapp
  domain: mybluemix.net
  command: node app.js
In this example, we specify the resource requirements, buildpack, route (host + domain), and a starting command.
After an application is started, we can easily manage its state and resources:
1
2
3
4
5
6
7
8
9
10
# Start, stop, restart app
cf start [app-name]
cf stop [app-name]
cf restart [app-name]

# Delete the app and its routes
cf delete [app-name] -r

# Manually scale the app
cf scale [app-name] -i [num-instances] -m [memory-size]
When things go wrong, we will need to check the app’s log and configuration:
1
2
3
4
5
6
7
8
9
10
11
# List all environment variables of the app
cf env [app-name]

# Tail in real time the app's log
cf logs [app-name]

# Check the latest app log
cf logs --recent [app-name]

# Check the latest events - e.g. restarting, deployment
cf events [app-name]
Services
Cloud Foundry applications host buisiness logic specific to our problem domain - e.g. web user interface or APIs. Almost every other architectural component is classified as a service. In Cloud Foundry, services can be attached to an application so that it can use them.
For example, data bases, data analytics APIs, pub-sub systems, and
even autoscaling can be implemented as services.
Whenever the application logic needs to know about a service instance (e.g. to
connect to a database), this information is provided via the VCAP_SERVICES
environment variable, which is a JSON string. The application is
responsible to parse it and connect with the specified endpoints and
credentials.
Here is an example of the VCAP_SERVICES variable when an application is bound to
an instance of the Cloudant NoSql database:
1
2
3
4
5
6
7
8
9
10
11
12
13
14
15
16
17
18
19
20
21
22
23
"VCAP_SERVICES": {
  "cloudantNoSQLDB": [
    {
      "credentials": {
        "host": "******",
        "password": "******",
        "port": 443,
        "url": "******",
        "username": "******"
      },
      "label": "cloudantNoSQLDB",
      "name": "TestCloudantWithNode-cloudantNoSQLDB",
      "plan": "Lite",
      "provider": null,
      "syslog_drain_url": null,
      "tags": [
        "data_management",
        "ibm_created",
        "ibm_dedicated_public"
      ]
    }
  ]
}
The following diagram depicts a Rails application, which accesses two service
instances. The access credentials are specified in the VCAP_SERVICES
environment variable, which the application code parses and uses.

Let’s see how to work with services:
1
2
3
4
5
6
7
8
9
10
11
12
13
14
15
16
17
18
19
20
# List all available services
cf marketplace

# Check out an individual service offering
cf marketplace -s [service-name]

# List all available service instances in the space
cf services

# Create a new service instance with a plan (e.g. Free, Lite, Paid)
cf create-service [service-name] [plan] [new-service-instance-name]

# Delete a service instance
cf delete-service [service-instance-name]

# Bind a service instance to an app
cf bind-service [app-name] [service-instance-name]

# Unbind a service instance from an app
cf unbind-service [app-name] [service-instance-name]
Cloud Foundry also allows us to wrap existing/legacy systems (e.g. on-premise data bases) as service instances through the cups command.
Finally, an app can specify its service instance dependencies in the manifest.yml file.
Hence, when pushed it will automatically bind to the respective service
instances.

