Table of Contents
- Introduction
- Set up
- Javalin
- Testing
- Externalisation
- Code Formatting with Spotless
- Code Analysis with Spotbugs
- SonarQube
- Dependency Vulnerability Analysis
- Docker Image
- Docker Image: Vulnerability Analysis
Introduction
I often have to build a small Java-based API or microservice. Using Jakarta EE or Spring sometimes feels like an overkill, especially when I work with teams which are not experienced with Java.
In this post, I’ll explain how to build an unopionated, production ready API which isn’t coupled with complex frameworks or requiring understanding of the Java enterprise ecosystem. We’ll cover how to do automate testing, formatting, code analysis, and vulnerability checks with Gradle commands.
The API starter code is on GitHub and in the rest of this post we’ll break it down.
Set up
Let’s start by setting up a local dev environment. I like SDKMAN, which is a utility for installing and managing different versions of Java and related tools:
1
2
3
4
5
6
7
8
9
# Install SDKMan, if you don't have it
curl -s "https://get.sdkman.io" | bash

# View all available Java distributions:
sdk list java

# Install the latest Java 17 Temurin distro
# (Temurin used to be called AdoptOpenJDK)
sdk install java 17.0.8-tem
If you cloned the GitHub project, then that’s all you need.
If you want to follow along, then you’ll need gradle to initialise the project:
1
2
3
4
5
# View available Gradle distributions:
sdk list gradle

# Install a gradle version from the above list
sdk install gradle 8.2.1
Now let’s initialise a project with gradle init. This will open a terminal “wizard”,
and we’ll have to select the following:
1
2
3
4
5
6
7
8
9
10
11
12
13
14
15
16
17
18
19
20
21
22
23
24
25
26
27
28
29
30
31
> gradle init
Select type of project to generate:
  1: basic
  2: application
Enter selection (default: basic) [1..4] 2

Select implementation language:
  1: C++
  ...
  3: Java
Enter selection (default: Java) [1..6] 3

Split functionality across multiple subprojects?:
  1: no - only one application project
  2: yes - application and library projects
Enter selection (default: no - only one application project) [1..2] 1

Select build script DSL:
  1: Groovy
  2: Kotlin
Enter selection (default: Groovy) [1..2] 1

Select test framework:
  1: JUnit 4
  ...
  4: JUnit Jupiter
Enter selection (default: JUnit Jupiter) [1..4] 4

Project name (default: java-api-starter):
Source package (default: java.api.starter): com.nikgrozev
Enter target version of Java (min. 7) (default: 17): 17
The above creates a single project
gradle application
which can run a main method and packages your code in an archive. If you’re new to gradle,
you can have a look at the Gradle Quickstart tutorial.
From now on, we’ll use the Gradle Wrapper
script ./gradlew to ensure consistent builds across environments.
Open the new project in you favourite IDE. At this point, we have a functioning Java app,
with a main method App.java and a unit test in AppTest.java. We can already build, test,
run, and check the docs:
1
2
3
4
5
6
7
8
9
10
11
12
# Clean up, compile and rebuild
./gradlew clean build

# Run the JUnit5 tests
./gradlew test

# Run the app locally
./gradlew run

# Checkout all gradle tasks or get help for a task
./gradlew task
./gradlew help --task test
Next, let’s build a single executable uber jar file, which we can distribute.
One approach is to modify the
jar task in build.gradle:
1
2
3
4
5
6
7
8
9
10
// Based on https://www.baeldung.com/gradle-fat-jar
jar {
    duplicatesStrategy = DuplicatesStrategy.EXCLUDE
    manifest {
        attributes "Main-Class": application.mainClass
    }
    from {
        configurations.runtimeClasspath.collect { it.isDirectory() ? it : zipTree(it) }
    }
}
Now we can build and run the executable jar file:
1
2
3
4
5
# Clean up, compile and rebuild
./gradlew clean build

# The above creates an executable uber jar file
java -jar ./app/build/libs/app.jar
Javalin
Javalin is a lightweight and unopiniated web server built on top of
Jetty. It’s easy to get started with and comes with convenient testing
utilities. Let’s add the following to build.gradle and rebuild:
1
2
3
4
5
6
7
dependencies {
    //...
    // Javalin Web Server
    implementation "io.javalin:javalin:5.6.1"
    // Allows Javalin to parse and create JSON
    implementation 'com.fasterxml.jackson.core:jackson-databind:2.15.0'
}
Javalin is quite easy to start with.
We just need to create a Javalin instance and add routes. I particularly like
the CRUD handler, which allows you to create
REST-ful endpoints and organise them in a separate class:
1
2
3
4
5
6
7
8
9
10
11
12
13
14
15
public class App {
    public static Javalin makeJavalinServer() {
        var app = Javalin.create();
        app.get("/api/health", ctx -> ctx.result("Healthy"));
        app.routes(() -> crud("/api/items/{id}",
          // ItemController is our implementation of Javalin's CrudHandler
          new ItemController())
        );
        return app;
    }

    public static void main(String[] args) {
        app.start(9090);
    }
}
For a full example, see the GitHub project. With the above, we have a fully functional web server:
1
2
3
# Run the app locally
# Checkout http://localhost:9090/api/health
./gradlew run
Beyond the basisc, Javalin offers many more advanced functionalities like before and after handlers, supports web sockets, validation and more.
Testing
Javalin supports two types of tests: unit tests for each handler and end-to-end tests. Let’s start by adding the following dependencies:
1
2
3
4
5
6
dependencies {
  // Mockito for unit testing Javalin
  testImplementation 'org.mockito:mockito-inline:5.2.0'
  // Javalin test utility
  testImplementation 'io.javalin:javalin-testtools:5.6.1'
}
For unit testing our handlers, we’ll use Mockito to mock all external dependencies, as in the following example:
1
2
3
4
5
6
7
8
9
10
11
12
13
14
15
16
17
18
19
public class ItemControllerTest {
    private final Context ctx = mock(Context.class);
    private ItemController controller = new ItemController();

    @BeforeEach
    void setUp() {
        controller.setItems(List.of());
    }

    @Test
    void testCreate() {
        var newItem = new Item("id1", "item1");
        when(ctx.bodyAsClass(Item.class)).thenReturn(newItem);
        controller.create(ctx);
        verify(ctx).json(newItem, Item.class);
        assertEquals(1, controller.getItems().size());
        assertEquals("id1", controller.getItems().get(0).getId());
    }
}
This is great, but I prefer to mock as little as possible. Mocking excessively makes tests unreleastic. Fortunately, Javalin Test Tools allows us to test an actual instance of a Javalin webserver and make realistic API calls:
1
2
3
4
5
6
7
8
9
10
11
12
13
14
15
16
17
18
19
public class AppTest {
    private Javalin app;

    @BeforeEach
    void setUp() throws Exception {
        app = App.makeJavalinServer();
    }

    @Test
    void testHealthEndpoint() {
        JavalinTest.test(
                app,
                (server, client) -> {
                    var response = client.get("/api/health");
                    assertEquals(200, response.code());
                    assertEquals("Healthy", response.body().string());
                });
    }
}
Once again, the full code with the unit tests is available on GitHub.
Externalisation
Dotenv is a Java alternative of the popular npm package
dotenv. It allows us to keep all dev env variables
in a local file ./app/.env and load them from the app. In production, you wouldn’t have a .env
and then the library would load actual environment variables instead. Let’s add it as a dependency:
1
2
3
4
dependencies {
    // To read vars from .env file or environment
    implementation 'io.github.cdimascio:dotenv-java:3.0.0'
}
Now we can use it in our code:
1
2
3
4
5
6
7
8
9
public class App {
    public static void main(String[] args) {
        // load env vars via https://github.com/cdimascio/dotenv-java
        var dotenv = Dotenv.configure().ignoreIfMissing().systemProperties().load();

        var app = makeJavalinServer();
        app.start(Integer.parseInt(dotenv.get("PORT", "7070")));
    }
}
Code Formatting with Spotless
Spotless is a popular
linter for Java and it comes with a handy Gradle Plugin.
Let’s add it to our build.gradle:
1
2
3
4
5
6
7
8
9
10
11
12
13
14
15
16
17
18
19
20
21
22
23
24
plugins {
    // ...
    id "com.diffplug.spotless" version "6.20.0"
}

// Based on https://github.com/diffplug/spotless/tree/main/plugin-gradle
 spotless {
   format 'misc', {
     // define the files to apply `misc` to
     target '*.gradle', '*.md', '.gitignore'

     // define the steps to apply to those files
     trimTrailingWhitespace()
     // or tabs/spaces. Takes an integer argument if you don't like 4
     indentWithSpaces()
     endWithNewline()
   }
   java {
     // apply a specific flavor of google-java-format
     googleJavaFormat('1.17.0').aosp().reflowLongStrings()
     // fix formatting of type annotations
     formatAnnotations()
   }
 }
In the above, we used out-of-the-box formatter from Google. Have a look at the documentation to see all configuration options.
Now we can format the code or check if it complies with the format:
1
2
3
4
5
# Check for violations (useful in CI)
./gradlew spotlessJavaCheck

# Format the code with Spotless
./gradlew spotlessJavaApply
Code Analysis with Spotbugs
Spotbugs is a great tool for code analysis and it has a Gradle Plugin as well. Let’s configure it with the default:
1
2
3
4
5
6
7
8
9
10
11
12
13
14
15
16
17
18
19
20
21
22
23
24
25
26
27
28
plugins {
    // ....
    id "com.github.spotbugs" version "5.0.14"
}

// Extensions - https://spotbugs-gradle-plugin.netlify.app/com/github/spotbugs/snom/spotbugsextension
spotbugs {
    ignoreFailures = false
    showStackTraces = true
    showProgress = true
    effort = 'default'
    reportLevel = 'default'
    reportsDir = file("$buildDir/reports/spotbugs")
}
spotbugsMain {
    reports {
        html {
            required = true
        }
    }
}
spotbugsTest {
    reports {
        html {
            required = true
        }
    }
}
Now we can analyse our code and generate HTML reports for every violation:
1
2
3
# Analyse the code for issues with SpotBugs
# HTML reports are generated in ./app/build/reports/spotbugs
./gradlew spotbugsMain spotbugsTest
Spotless is very configurable, and you can check their documentation about the various options.
SonarQube
SonarQube is a popular code analysis tool. It usually runs in a central server within an organisation. Developers and CI tools can submit code for analysis, which is then validated against a predefined Quality Gate.
Let’s configure a Gradle Plugin to push code to a SonarQube instance. Before that, we’ll need to congirue test coverage reports, so that SonaQube can inspect that too (SonarQube won’t run your tests). We’ll use the popular JaCoCo code coverate tool: :
1
2
3
4
5
6
7
8
9
10
11
12
13
14
15
16
17
18
19
20
21
22
23
24
25
26
27
28
plugins {
    // ...
    id "org.sonarqube" version "4.3.0.3225"
    id 'jacoco'
}

// https://docs.gradle.org/current/userguide/jacoco_plugin.html
test {
     // report is always generated after tests run
    finalizedBy jacocoTestReport
}
jacocoTestReport {
    // tests are required to run before generating the report
    //  By default, reports go into app/build/reports/jacoco
    dependsOn test
    reports {
        xml.required = true
    }
}

// https://docs.sonarsource.com/sonarqube/latest/analyzing-source-code/scanners/sonarscanner-for-gradle/
sonar {
    properties {
        property "sonar.projectKey", rootProject.name
        property "sonar.projectName", rootProject.name
        property "sonar.host.url", "???"
    }
}
To run a SonaQube analsis, please change the SonaQube url in the above config. You’ll also need an access token:
1
2
3
4
5
# Push the code for analsys to a SonarQube instance
# Note 1: you need to edit "build.gradle" and add your "sonar.host.url"
# Note 2: you need an env var SONAR_TOKEN to authenticate
export SONAR_TOKEN=???
./gradlew sonar
Dependency Vulnerability Analysis
Dependency vulnerability analysis is essential to maintain a healthy and secure application. We’ll use the OWASP Gradle plugin to inspect our code - let’s configure it:
1
2
3
4
5
6
7
8
9
10
11
12
13
14
15
16
17
18
19
20
21
22
23
24
25
26
27
28
29
30
31
plugins {
    // ...
    id "org.owasp.dependencycheck" version "8.1.2"
}

// Results will be in app/build/reports/dependency-check-report.html
dependencyCheck {
    // Low(0.1-3.9), Med(4.0-6.9), High(7.0-8.9), Critical(9.0-10.0)
    failBuildOnCVSS = 7

    // Based on https://github.com/dependency-check/dependency-check-gradle/issues/22#issuecomment-575568801
    def skipConfigurationPatterns = [
        "test.*",
        "spotbugs.*",
        "spotless.*",
        "sonar.*",
        "jacoco.*"
    ]
    allprojects {
        configurations.all { configuration ->
            if (configuration.name in skipConfigurations) {
                return
            }
            skipConfigurationPatterns.each { pattern ->
                if (configuration.name.matches(pattern)) {
                    skipConfigurations << configuration.name
                }
            }
        }
    }
}
In the above configuration, we’ve ignored medium and lower severity dependencies (failBuildOnCVSS = 7).
We are also ignoring test and tool dependencies (e.g. of spotbugs and sonar) as we will not package
them into our build. Now we can run a check, which will also generate an HTML report:
1
2
3
# Check the dependencies for known high or ciritcal vulnerabilities
# Results will be in app/build/reports/dependency-check-report.html
./gradlew dependencyCheckAnalyze
Docker Image
Finally, let’s package our application in a Docker image. We will use a two-stage Dockerfile. The first stage will build the executable jar file, and the second will run it.
I’ve chosen to use the Eclipse Temurin official Docker image a base image. If you want to minimise the resulting docker image you may use its Alpine variant or another base image. Furthermore, the Eclipse Temurin page documents how to use jlink to create a smaller and custom JRE, which would result in an even smaller image. For simplicity, let’s just use the out of the box image:
1
2
3
4
5
6
7
8
9
10
11
12
13
14
15
16
17
18
19
20
21
22
23
FROM eclipse-temurin:17 as builder

# Set the working directory inside the container
WORKDIR /app

# Copy the code after installing dependencies - Note! .dockerignore
COPY . .

# Run the Gradle build to compile the app
RUN ./gradlew clean build

# Stage 2: Build the actual container from the builder's output
FROM eclipse-temurin:17

# The port we're listening on
# Copy build bundle from the builder container
COPY --from=builder /app/app/build/libs/app.jar /app/

# Make sure we don't run as root
RUN chown -R nobody /app
USER nobody

CMD ["java", "-jar", "/app/app.jar"]
It’s a good practice to add a .dockerignore file to your code base. This will speed
up the build. I have added a
sample one in the GitHub project.
Let’s proceed to build and tag our docker image:
1
docker build . -t java-api-starter
Now we can start the image locally. It’s often convenient to pass all required env variables in a file:
1
2
3
4
5
6
# Replace 9090 with the PORT from .env
# Visit http://localhost:9090/api/health
docker run \
  -p 9090:9090 \
  --env-file=./app/.env \
  java-api-starter
To debug the image locally, we can open a shell “into” it:
1
2
3
4
5
6
7
# Replace 9090 with the PORT from .env
# Will open a shell
docker run \
  -p 9090:9090 \
  --env-file=./app/.env \
  -it java-api-starter \
  /bin/sh
Docker Image: Vulnerability Analysis
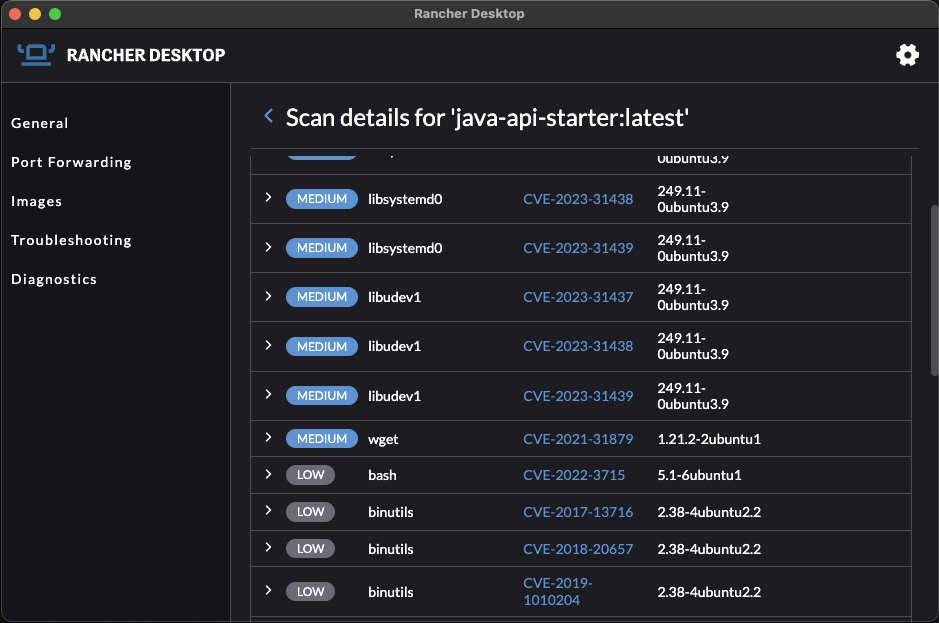
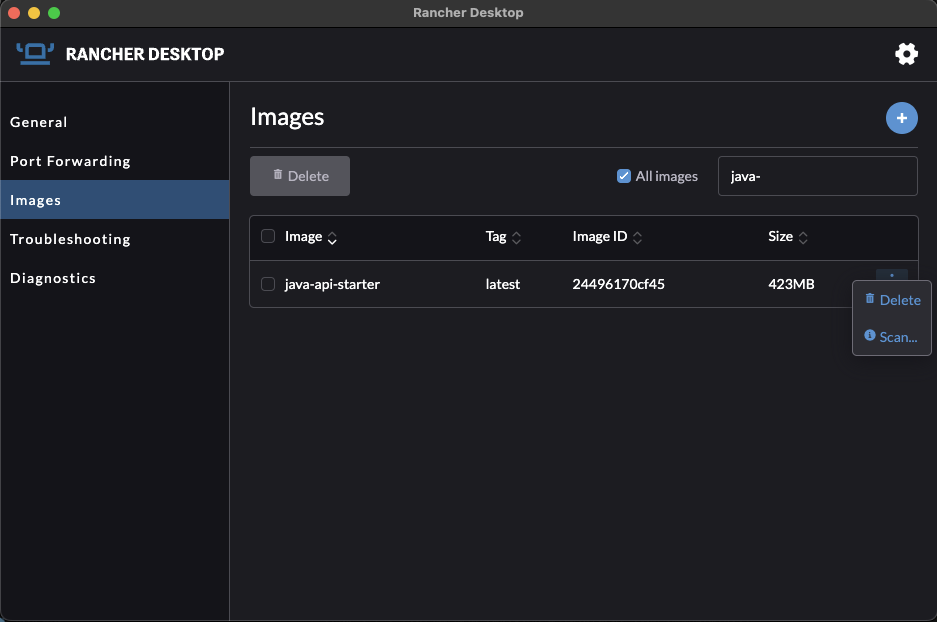
Many CI/CD tools scan images for known vulnerabilities. I often find it useful to scan the image locally, so I can quickly experiment with different approaches to mitigate vulnerabilities. I find Rancher Desktop very useful. It allows me to pick a local docker image and scan it in the UI.
Let’s start by selecting an image to scan:
And then we can preview all known vulnerabilities and their severity: