
Introduction
One of the major obstacles in Cloud computing research is the lack of representative “cloudy” applications and workloads. This makes it hard for researchers to test their new approaches in areas like load balancing, resource provisioning and autoscaling with realistic industry-inspired environments. The CloudSuite 2.0 suite of benchmarking applications tries to address just that. It comprises 8 benchmarks, which represent a large spectrum of typical applications run in cloud environments. Among them is CloudStone, which is a social media 3-tier web application benchmark. It is very useful in the research of web applications hosted in clouds, as it is the only (to the best of my knowledge) modern Web 2.0 benchmarking application.
However, as with other academic benchmarking tools, the installation is not straightforward. Some insidious bugs and middleware incompatibilities need to be patched, making it quite difficult to set up and use. This article introduces several scripts that automate CloudStone’s installation on 64bit Ubuntu 14.04 virtual machines. These scripts have been tested in Amazon AWS, but in principle they should work in other Infrastructure as a Service (IaaS) environments as well.
CloudStone Overview
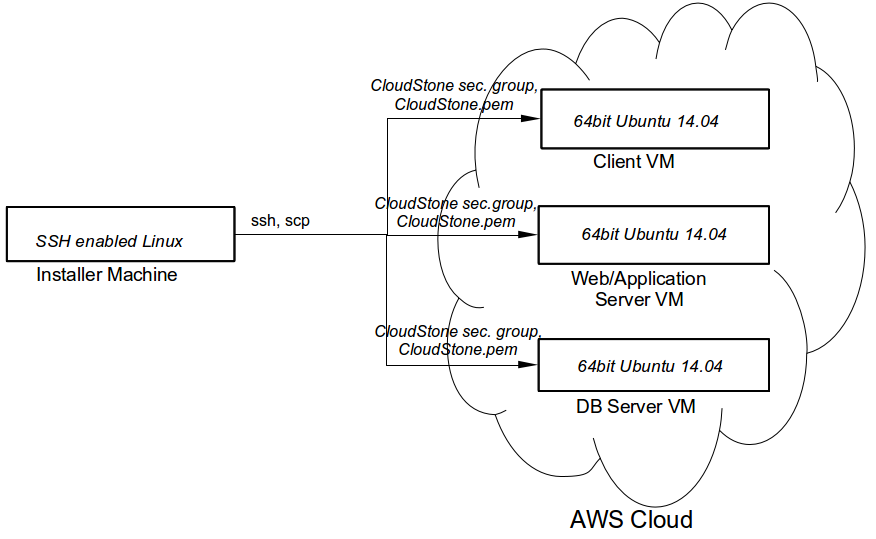
In its simplest form CloudStone is composed of three Virtual Machines (VMs) running the Olio application - a client/driver, a web/application server (AS) and a database server (DB). The client machine executes the workload, consisting of multiple users’ actions, against the AS server. The web server VM runs the application itself in a Nginx server. It also hosts a filestore with users’ multimedia content (e.g. images). The DB server provides access to a MySql database with the application data. It also hosts a GeoCoder service hosted in an Apache Tomcat instance providing geocoding services (e.g. mapping latitude/longitude to zip codes) to the application server.
The load generation and the performance monitoring are enabled by the Faban benchmarking harness. The so called Faban master (or driver) process runs on the client VM, and emulates the user workload to the servers. The Faban driver starts Faban agent processes on the AS and DB servers, through which it monitors their performance throughout the benchmark execution.
The following diagram depicts the target setup of CloudStone:

Prerequisites
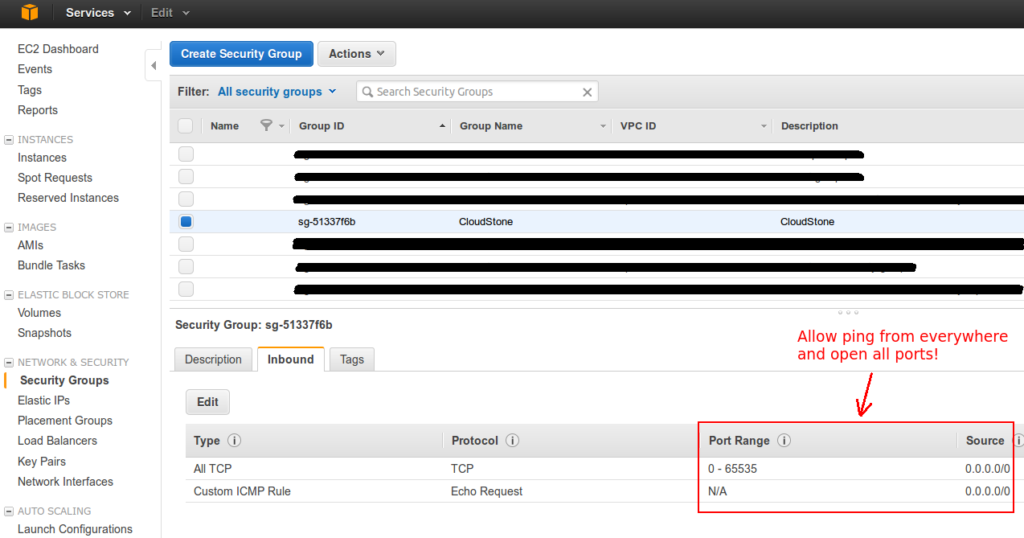
Security Notice: CloudStone implicitly requires that all VM machines can ping each other and connect to each other at random ports. T hus you should create a separate firewall setting (i.e. a Security Group), which allows this and which is used only for running CloudStone. The following screenshot shows the security group used in this tutorial, which allows pinging and access to all TCP ports from anywhere. Alternatively, you can create a security group allowing such access only from the CloudStone VMs’ addresses. Furthermore, CloudStone assumes that all machines can ssh into each other without any prompts. Hence, our scripts need to copy the key (i.e. the pem file) across all machines. Thus, it is advised to create a new pem file only for running CloudStone.
Before starting the setup, you should create 3 VM instances running 64 bit Ubuntu 14.04 - the client, the web and the DB servers. They should be configured with a permissive Security Group and using the same dedicated pem file, as described above. The application/web server VM should have at least 50GB mounted disk storage in order to host the filestore.
You should also have a fourth Linux machine, which will guide the installation process. We will call it the “Installer” machine. This could be your PC or laptop. If you don’t have a Linux machine available, you could use a dedicated VM in the cloud. It uses SSH and SCP to configure appropriately and start all servers. The next diagram depicts the setup topology.
Installation
After configuring the CloudStone VMs, you can continue with the installation. The installation scripts are hosted in a GitHub repository called CloudStoneSetupOnUbuntu. From the installer machine you can either clone the GIT repository, or download the archive and extract it. After that you need to copy the pem file (e.g. CloudStone.pem) for accessing the VMs into the newly created directory with the scripts.
As a next step you need to tell the scripts the addresses of the CloudStone VMs and the name of the key.
Edit the main_installer.sh file and modify the properties with the VM addresses and the key name.
It should look something like that:
1
2
3
4
5
clientIPAddress=ec2-XX-XX-XX-XX.ap-southeast-2.compute.amazonaws.com
asIPAddress=ec2-XX-XX-XX-XX.ap-southeast-2.compute.amazonaws.com
dbIPAddress=ec2-XX-XX-XX-XX.ap-southeast-2.compute.amazonaws.com

pemFile=CloudStone.pem
Now we are ready to proceed with the installation. From the directory with the scripts, issue the following command:
1
sudo bash main_installer.sh
This will start the installation process. In the beginning, you may be prompted to accept the addition of the 3 VMs to the list of known ssh hosts. The installation can take quite some time! To monitor the progress and check for errors you can look at the log, which is written to the following files in the home directory of the installer machine:
~/client-setup.log- the log for installing the Client VM. The first to be written.~/as-setup.log- the log for installing the Web/AS VM. Written after the installation of the Client VM.~/db-setup.log- the log for installing the DB VM. Written after the installation of the Web/AS VM.
If the installation is successful you shouldn’t see any error messages in the logs and each log file should
end with an INSTALLATION SUMMARY section similar to the following one:
1
2
3
4
5
6
7
8
==== ==== ==== ==== INSTALLATION SUMMARY ==== ==== ==== ====

$JAVA_HOME:     /usr/lib/jvm/java-6-openjdk-amd64
$JDK_HOME:      /usr/lib/jvm/java-6-openjdk-amd64
$OLIO_HOME:     /cloudstone/apache-olio-php-src-0.2
$FABAN_HOME:    /cloudstone/faban
$APP_DIR:       /var/www
$FILESTORE:     /mnt/filestorage
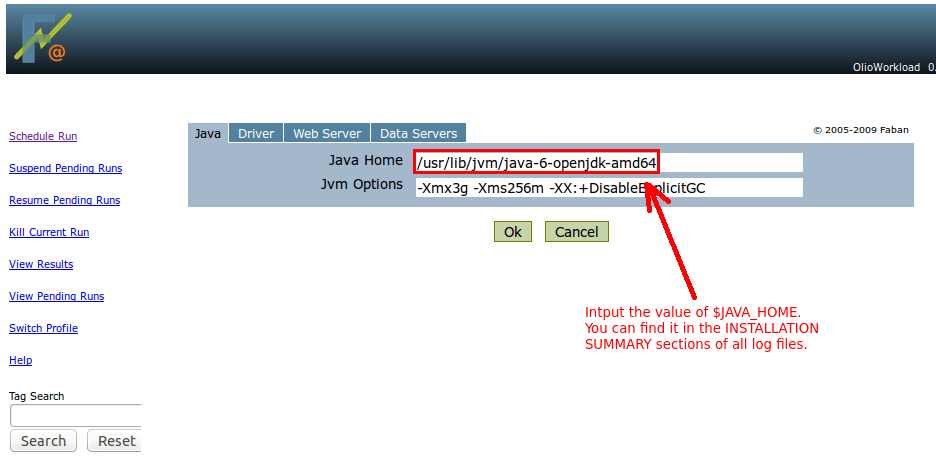
The summary sections of the log files list installation environment variables, showing where the different components are installed. We will need this information to run CloudStone.
Running CloudStone
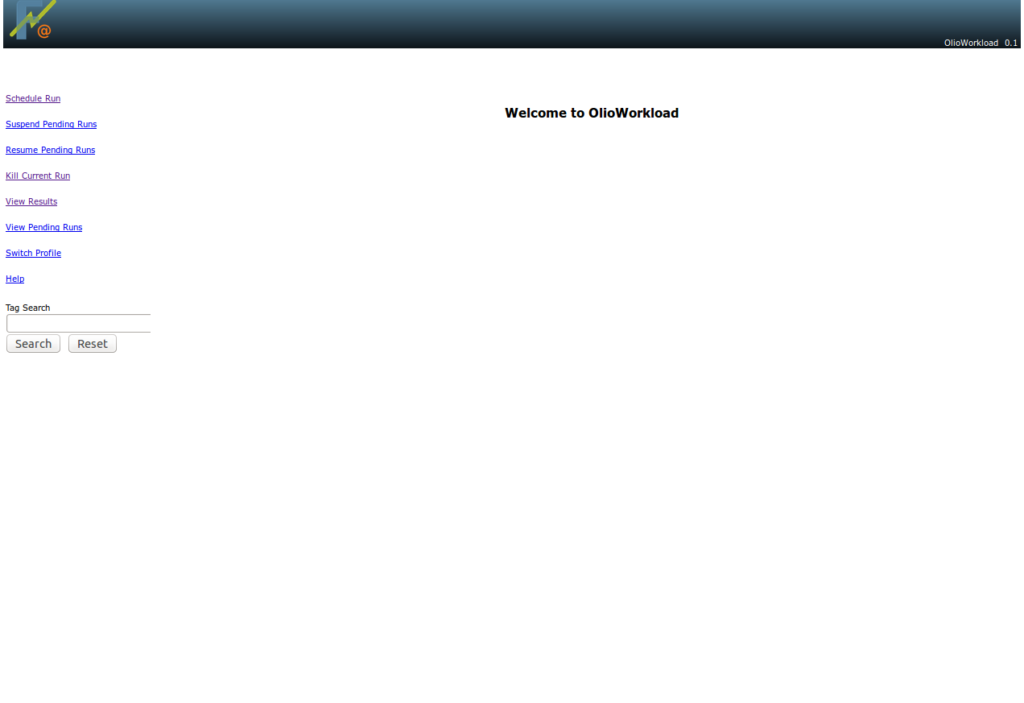
To run CloudStone point your browser to http:// [ client-vm-address ] :9980, where [client-vm-address] is the address of the Client VM. You should see a screen like the following one:
Click on Schedule Run, input a profile name (e.g. Test) and click select. In the following wizard,
you need to define the details of the CloudStone setup and the executed workload.
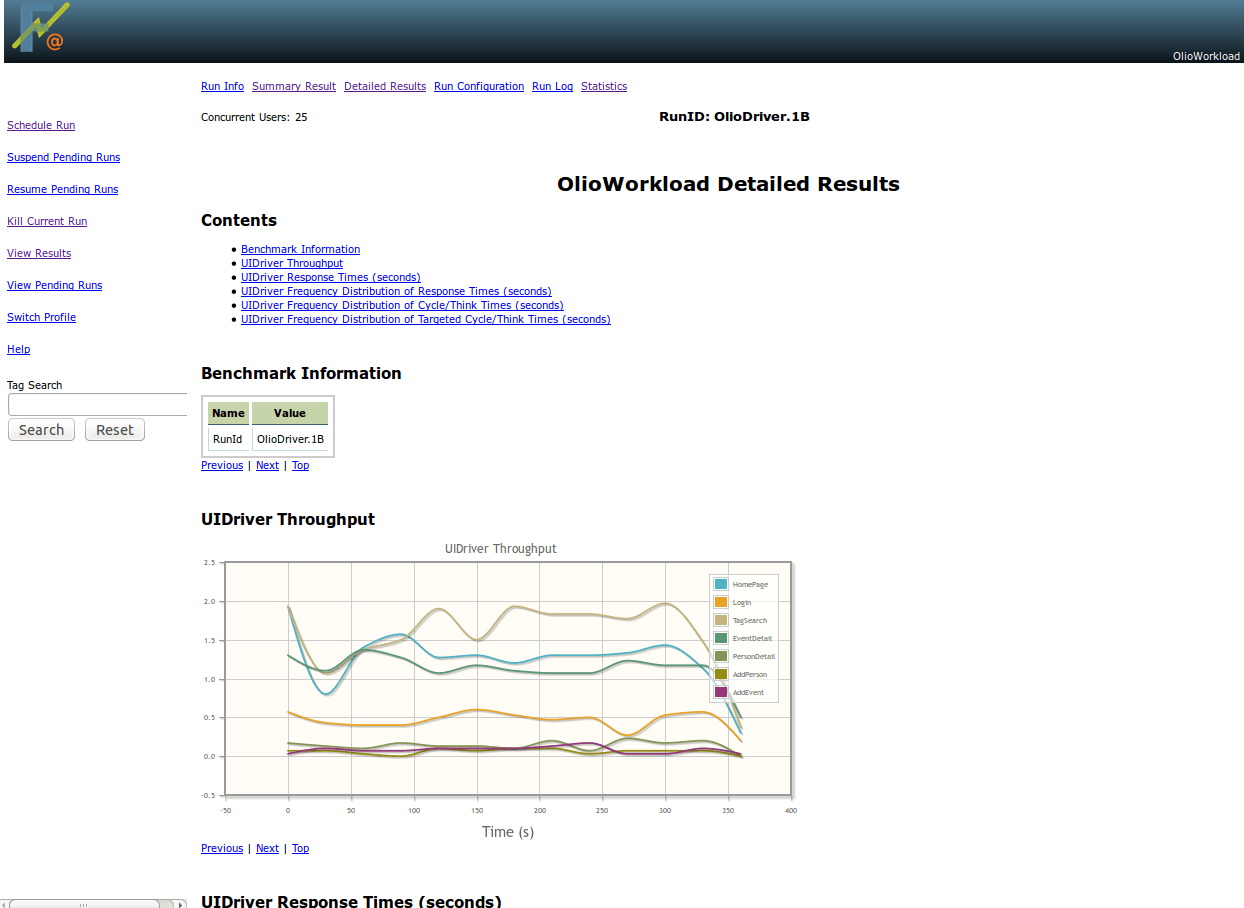
You can use the following screenshots as a guide:
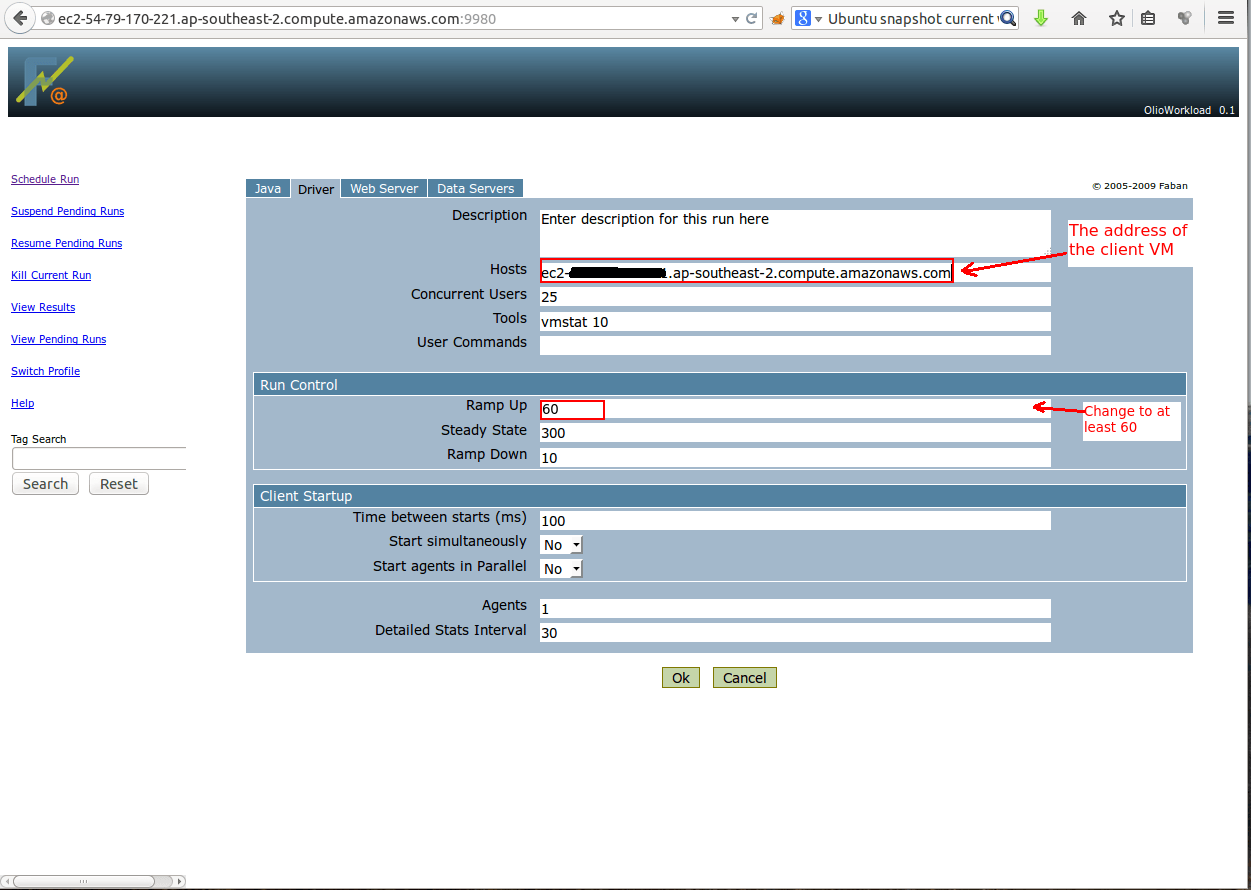
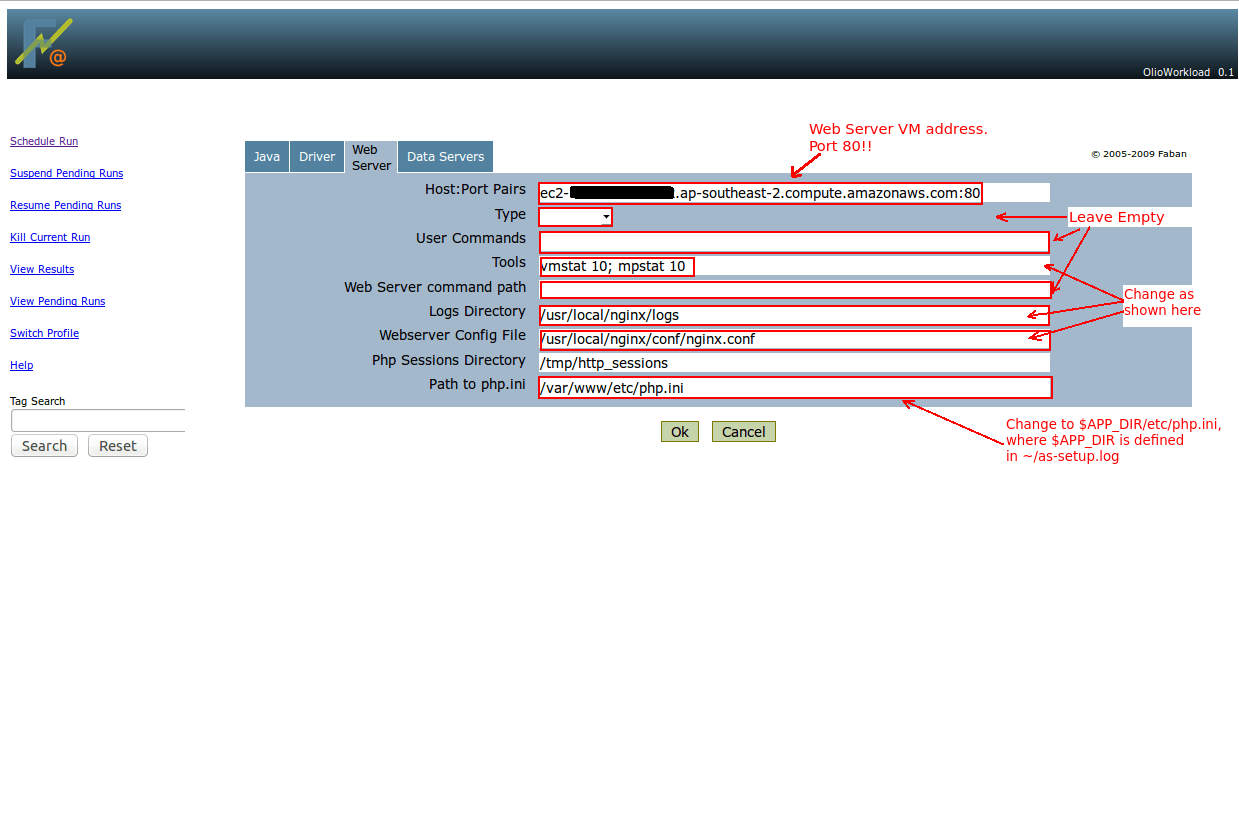
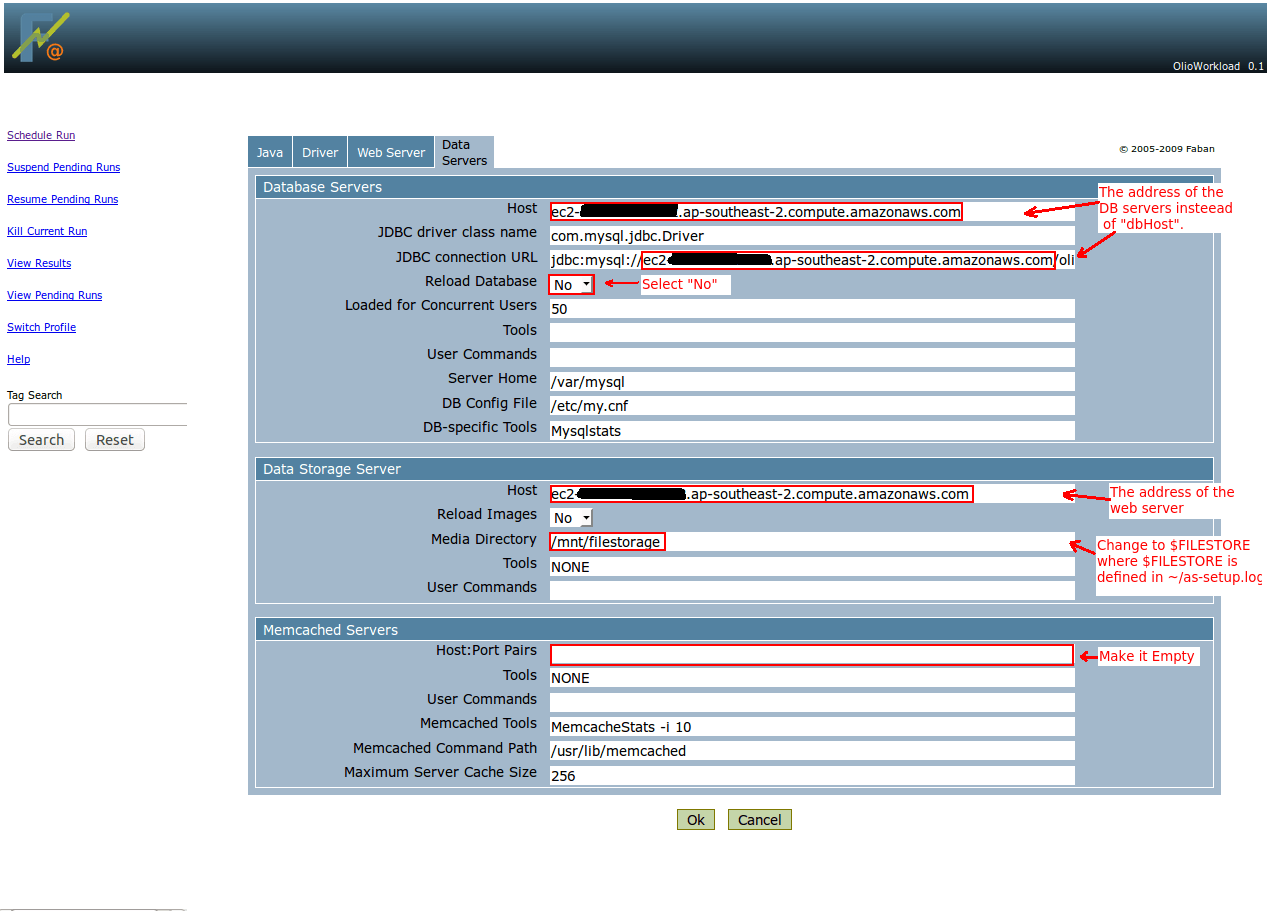
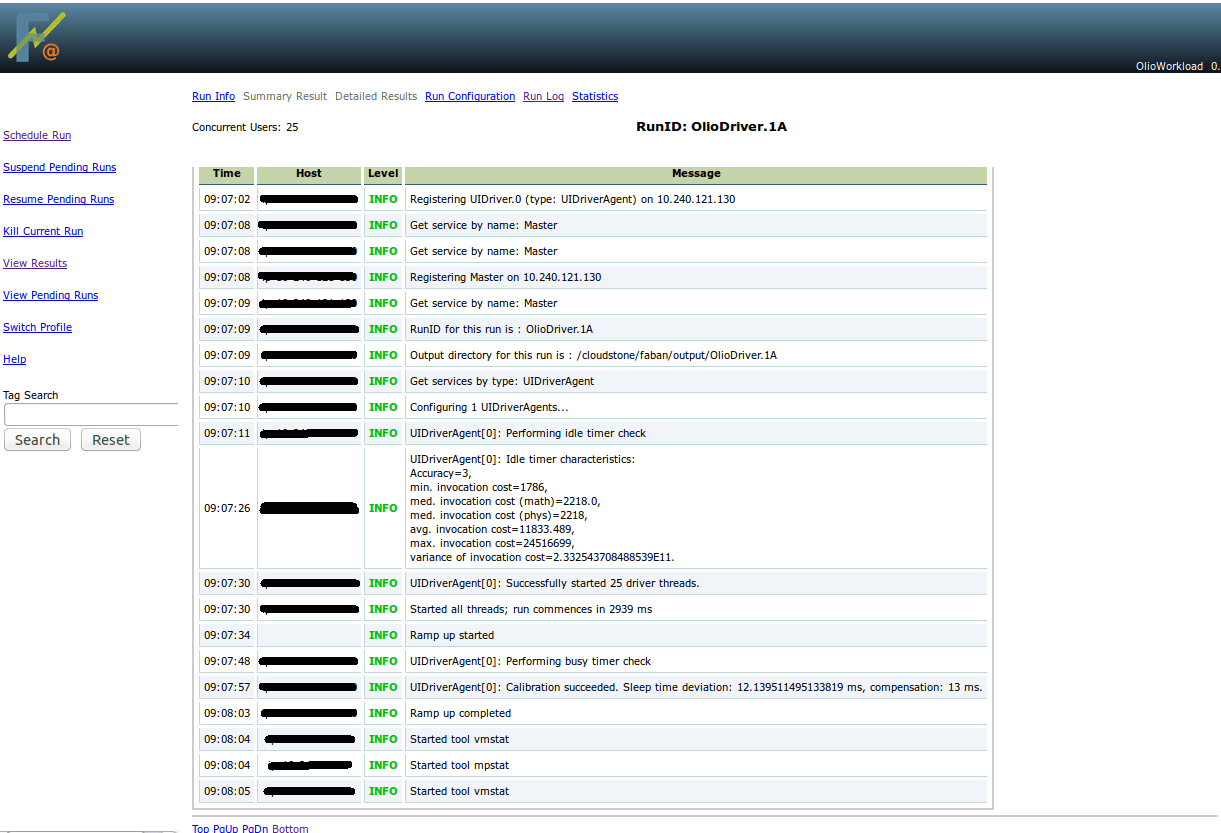
After setting up the benchmark click OK to start it. You can view the benchmark progress and
eventually the result from the View Results menu.
Now that you’ve got CloudStone up and running, you can run different workloads (i.e. number of users) by just modifying the appropriate parameters.
Under The Cover
We saw that the installation was done by configuring and running a single bash script. This section is more technical and describes in more details the structure of the installation scripts, so you can debug if something goes wrong.
The main function of the main_installer.sh script is to run in sequence the installations of the
CloudStone VMs and to transfer the required files to and from the servers. Under the cover,
main_installer.sh sets the parameters of, transfers and runs 3 scripts on the CloudStone VMs. These are:
client-setup.sh- executed on the client VM. Its log is redirected to~/client-setup.logon the installer machine.as-setup.sh- executed on the web/application server VM. Its log is redirected to~/as-setup.logon the installer machine.db-setup.sh- executed on the DB VM. Its log is redirected to~/db-setup.logon the installer machine.
Two additional scripts implement the installation logic which is common for multiple CloudStone VMs:
base-setup.sh- executed by all setup scripts. Installs common packages, sets up common variables etc.base-server.sh- executed byas-setup.shanddb-setup.sh. Implements common logic for the installation of the web/application and DB server.
All these scripts have been written following the official CloudStone installation instructions. They also include fixes for a lot of unexpected errors and thus differ significantly from the official installation procedure.
The main differences are:
- CloudStone comes with a distribution of Faban, which according to the documentation should be deployed and used. However, this version had several issues when deployed on Ubuntu. I had to fork Faban on GitHub and implement workarounds for them. The scripts use the Faban fork instead of the original Faban distribution. A full list of changes to Faban can be seen from forked project’s history.
- CloudStone includes a distribution of PhP code, which according to the instructions needs to be compiled and installed. However, the PhP code had to be patched, as it depends on an old version of libxml2-dev and did not compile.
- Faban assumes all VMs can ssh into each other without any prompts. The installation scripts copy the pem file to the CloudStone VMs and ensure their ~/.ssh/config files are set properly to allow ssh without prompts.
- Many file permissions had to be changed and non-existing directories and files had to be created, so that the servers could have proper access to logs and system files.
- The privileges to the olio MySql user had to be granted for all IP addresses, not only the web/app server address. The problem was that MySql could not perform well DNS resolution of the elastic DNS address of the web server.
- The scripts automatically select the location for the filestore on the AS server. They dynamically inspect all mounted disks, and select the one with the largest amount of free storage space.
Conclusion
This article introduced several Bash scripts that automate the installation of the CloudStone 2.0 benchmark. In future articles I will explore how these scripts can be ported/rewritten to Chef or Puppet configurations, and how CloudStone can be configured to use a load balancer and multiple web/app servers… so stay tuned :)
References
Official installation documentation: