
Introduction
In a previous post I described a set of scripts for automatic installation of the CloudStone web benchmark, part of the CloudSuite 2.0 suite. They set up CloudStone in its standard topology - i.e. a workload driver/client, a web/app server and a databse server. While this is sufficient to explore the servers’ utilisation under different workloads, it is not enough to test its behaviour under various autoscaling and load balancing approaches, as it has a single web server.
This post covers how to achieve a more advanced CloudStone deployment with a dedicated load balancer “in front of” the web server, so that new web servers can be added dynamically. To accommodate multiple web servers we also need a central repository for the media filestore, which is shared across all of them. Thus, we use a dedicated Network File System (NFS) server to host the filestore.
Again the installation is automated with a set of scripts, which have been tested in Amazon AWS. In principle, they should also work in other Infrastructure as a Service (IaaS) environments, as long they support 64bit Ubuntu 14.04 virtual machines.
SetUp Overview
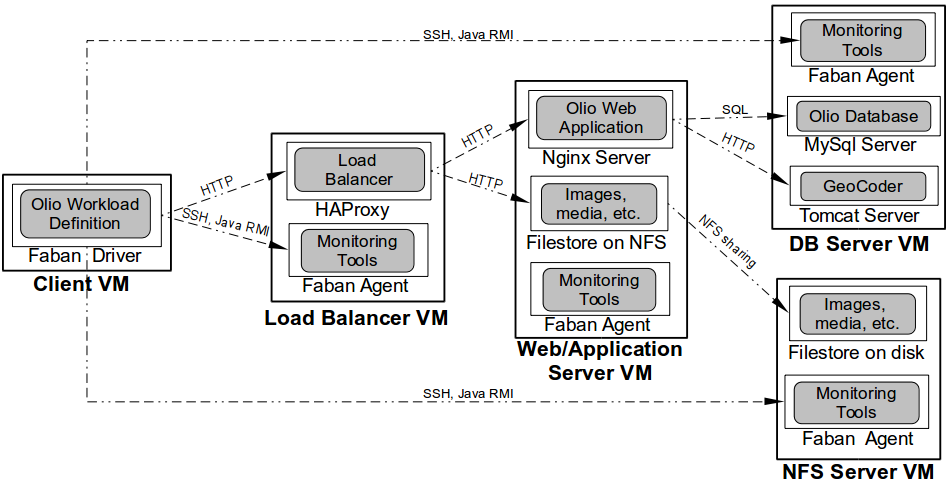
Unlike the standard CloudStone deployment, now we’ll need two more Virtual Machines - (i) a load balancer and (ii) a NFS server. Thus, overall we’ll need the following 64bit Ubuntu 14.04 VMs:
- Client/Driver VM - drives/runs the workload (i.e. emulated users’ requests) to the load balancer.
- Load balancer VM - redirects the requests to a set of web servers, using a HAProxy load balancer.
- Web/App server - serves users’ requests in a Nginx web server. Accesses the filestore of media files hosted on the NFS server.
- NFS server - hosts the filestore on its file system, and shares it trough NFS. Must have significant disk space!
- DB server - hosts a MySql server and a geocoding application.
The client uses Faban to set up and monitor the load balancer, DB and the NFS servers, through SSH and Java RMI - see the diagram. Note that in this setting the Client VM does not monitor the web server VM. In other words, the client does not “know” of its existence, and only sees the load balancer as its endpoint web server. This allows us to dynamically provision more instances of the web server VM and to transparently associate them with the load balancer.
Prerequisites
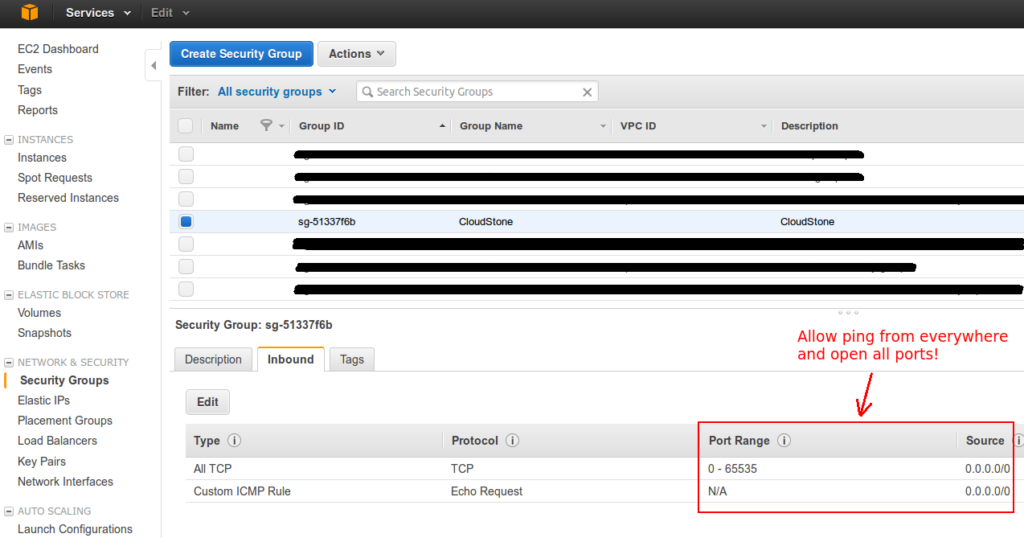
To be on the safe side I’ll repeat the Security Notice! from the previous CloudStone post. CloudStone implicitly requires that all VMs can ping each other and connect to each other at random ports. Thus, you should create a separate firewall setting (i.e. a Security Group), which allows this and which is used only for running CloudStone. The following screenshot shows the security group used in this tutorial, which allows pinging and access to all TCP ports from anywhere. Furthermore, CloudStone assumes that all machines can ssh into each other without any prompts. Hence, our scripts need to copy the key (i.e. the pem file) across all machines. Thus, it is advised to create a new pem file only for running CloudStone.
Before starting the setup, you should create 5 VM instances running 64 bit Ubuntu 14.04 – the client, the load balancer, the web, NFS, and the DB servers. They should be configured with a permissive Security Group and using the same dedicated pem file, as described above. The NFS server VM should have at least 200GB mounted disk storage in order to host the filestore for significant workloads. In AWS EC2, you could just increase the root EBS volume size to 1TB when starting the NFS Server VM from the AWS web interface.
You should have one more Linux machine, which will guide the installation process. We will call it the Installer machine. This could be just a PC/laptop or a dedicated VM in the cloud. It uses SSH and SCP to configure appropriately and start all servers. The next diagram depicts the setup topology.

Installation
Once all of this is done you can start the installation. The installation scripts are hosted in a GtiHub project called CloudStoneSetupOnUbuntuAdvanced, which is a fork of the original installation scripts project. From the installer machine you should either clone via git or download and extract this project. Then you need to copy your pem file (e.g. CloudStone.pem) in the scripts’ directory.
Next you need to edit main_installer.sh
with the DNS or IP addresses of the client, load balancer (lb), app/web server (as) and database server (db) VMs.
Additionally, you can put the name of your pem file, if different from CloudStone.pem.
You can also put an initial load scale, used to compute how many users the system should be populated with.
For more info on the load scale parameter look at the official CloudStone documentation.
Your main_installer.sh should start with something like this:
1
2
3
4
5
6
7
8
9
10
clientIPAddress=ec2-XX-XX-XX-XX.ap-southeast-2.compute.amazonaws.com
lbIPAddress=ec2-XX-XX-XX-XX.ap-southeast-2.compute.amazonaws.com
asIPAddress=ec2-XX-XX-XX-XX.ap-southeast-2.compute.amazonaws.com
dbIPAddress=ec2-XX-XX-XX-XX.ap-southeast-2.compute.amazonaws.com
nfsIPAddress=ec2-XX-XX-XX-XX.ap-southeast-2.compute.amazonaws.com

pemFile=CloudStone.pem
userName=ubuntu

load_scale=100
Now you can start the installation by typing the following from the scripts folder:
1
sudo bash main_installer.sh
In the beginning, you may be prompted to accept the addition of the 5 VMs to the list of known ssh hosts. Installation may take quite some time! In the meantime you can monitor the following installation logs on the installer machine:
~/client-setup.log– the log for installing the Client VM. The first to be written.~/nfs-setup.log– the log for installing the NFS server VM. Written after the installation of the Client VM.~/lb-setup.log– the log for installing the load balancer VM. Written after the installation of the NFS VM.~/as-setup.log– the log for installing the Web/AS VM. Written after the installation of the LB VM.~/db-setup.log– the log for installing the DB VM. Written after the installation of the Web/AS VM.
If all is successful you shouldn’t see error messages in the logs and each log file should end with an “INSTALLATION SUMMARY” section similar to the following one:
1
2
3
4
5
6
7
8
9
10
11
======== ======== INSTALLATION SUMMARY ======== ========

$JAVA_HOME:     /usr/lib/jvm/java-6-openjdk-amd64
$JDK_HOME:      /usr/lib/jvm/java-6-openjdk-amd64
$OLIO_HOME:     /cloudstone/apache-olio-php-src-0.2
$FABAN_HOME:    /cloudstone/faban
$APP_DIR:
$FILESTORE:
$NFS_MOUNT_PATH:
$CATALINA_HOME: /cloudstone/apache-tomcat-6.0.35
$GEOCODER_HOME: /cloudstone/geocoderhome
You’ll need these environment variables’ values to run CloudStone.
Running CloudStone
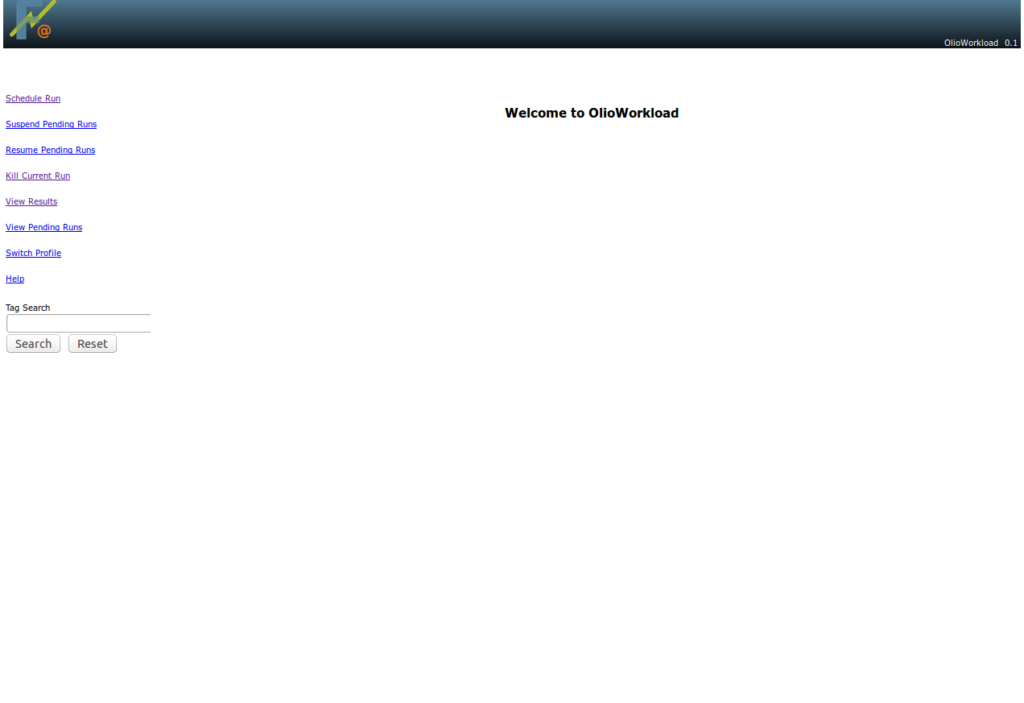
Just like in the previous post, to run CloudStone you need to point your web browser to http:// [ client-vm-address ] :9980 to see the following screen:
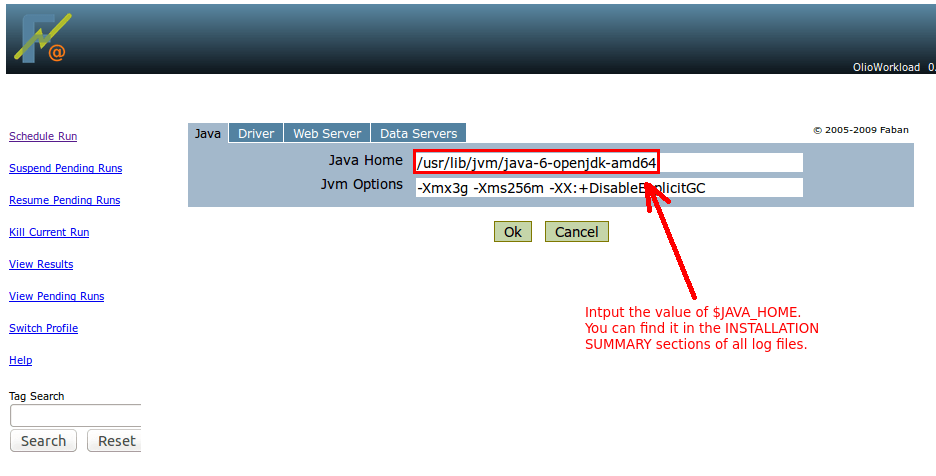
Then you need to schedule a new run, as in the previous post. The only differences are that (i) you need to use the load balancer address, instead of the web server and (ii) you need to specify the NFS server as a filestore server. The following screenshots give an overview:
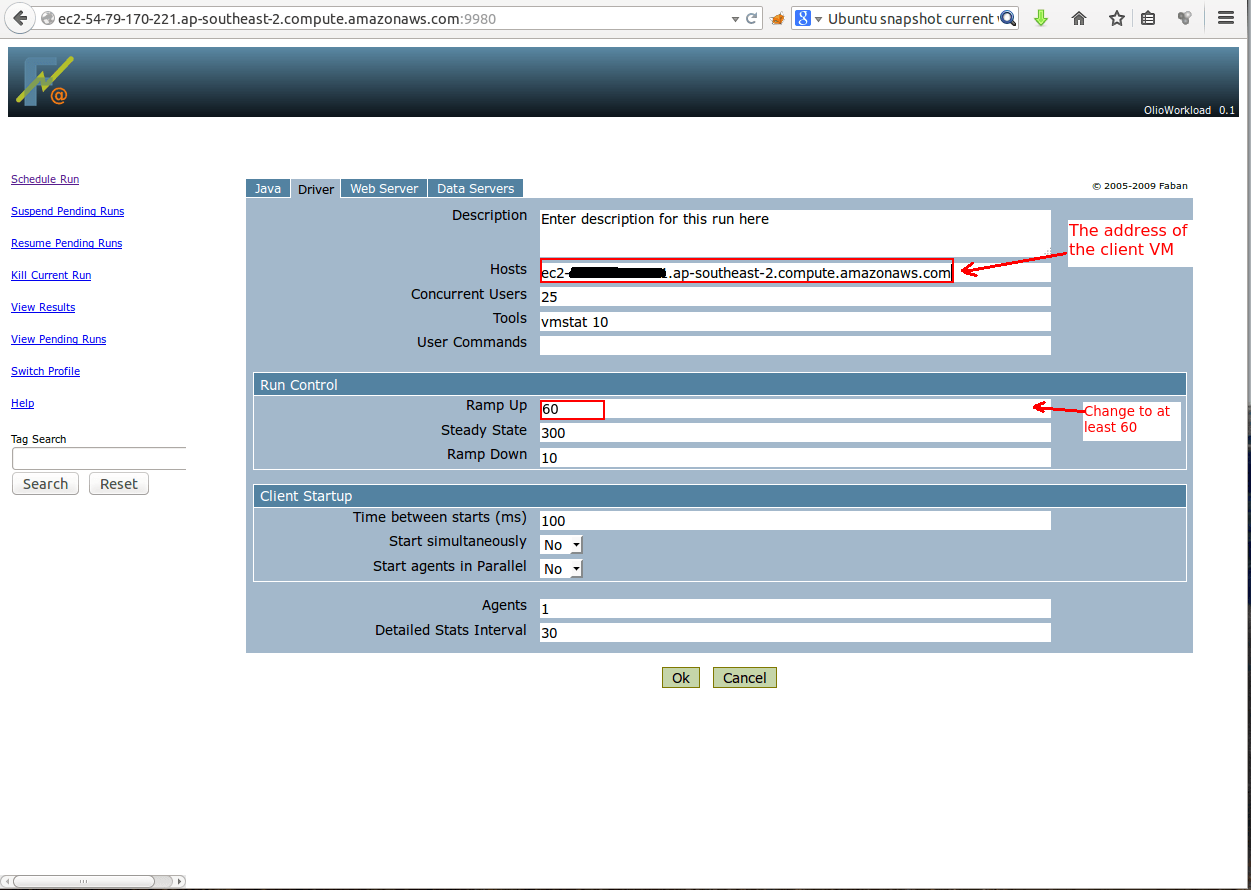
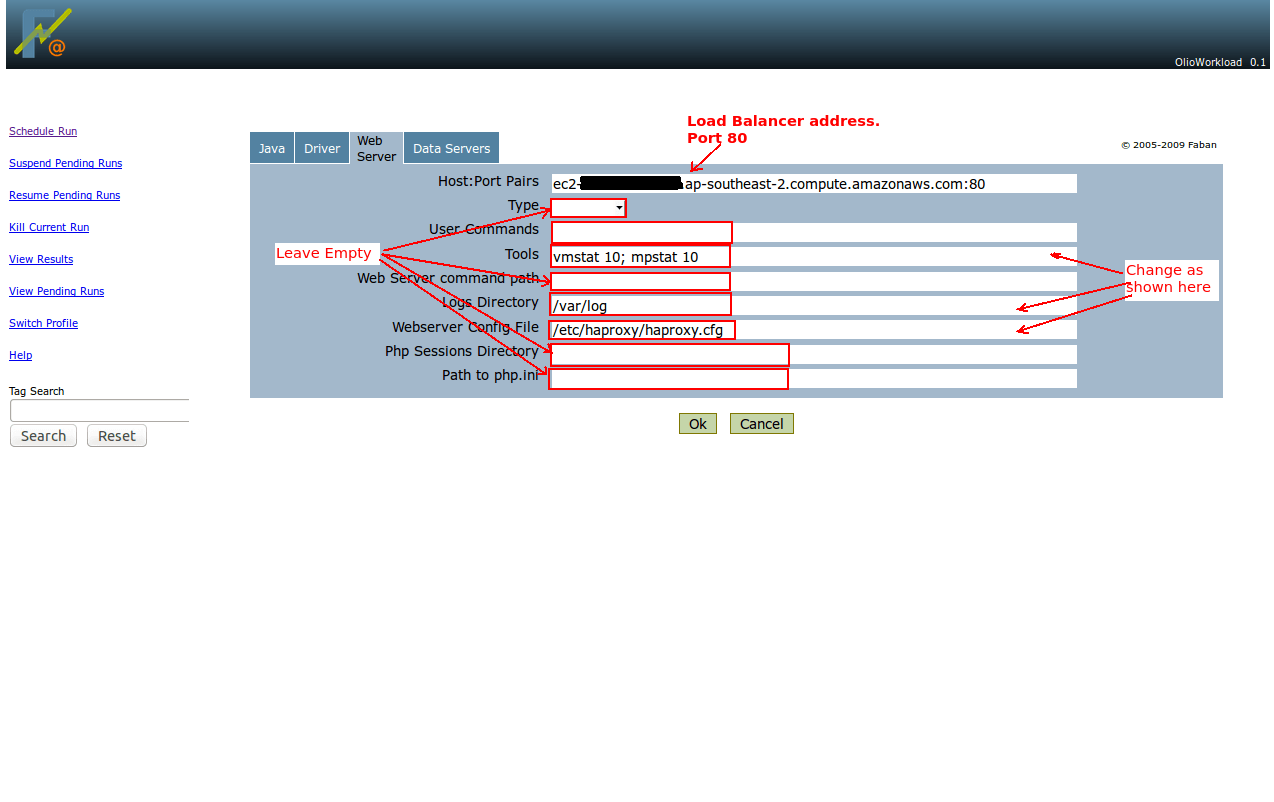
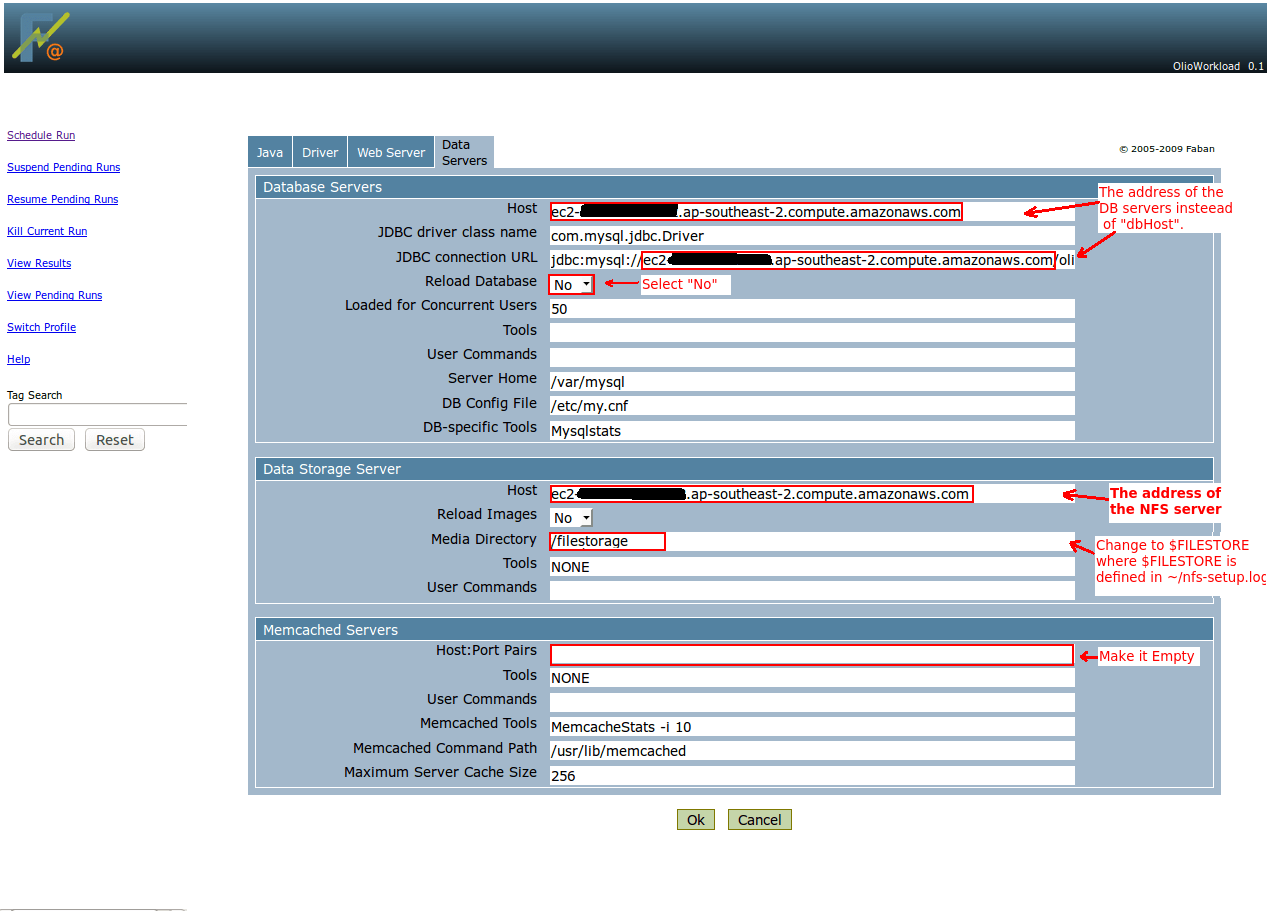
After setting up the benchmark click OK to start it. You can view the benchmark progress and eventually the result from the “View Results” menu.
Scaling Up
At this point the current set-up has a single web/app server. We can easily provision a new one and associate with the load balancer. To achieve this, we firstly need to replicate the web/app server VM. In AWS EC2, you can create a VM image from it (the so called AMI) and then create new VMs out of it. Other infrastructure as a service (IaaS) clouds have similar functionality as well. Of course, the new VM should have the same security group as the others.
After the new VM is created from the image it will automatically start its web server and will mount its NFS storage upon boot, so you don’t need to take care or that. However, you still need to associate it with the load balancer. Let’s assume the IP/DNS address of the initial/old web/app server is asIP1 and the new one’s is asIP2. Then you need to login into the load balancer VM and from the home directory issue the following commands:
1
2
3
4
5
6
7
8
9

# Import utility functions
. functions.sh

# Load balance with Round Robin policy with 1:1 ratio
resetLoadBalancer asIP1 1 asIP2 1

# Reload the load balancer's configuration
sudo service haproxy reload
Of course, in the above asIP1 and asIP2, should be replaced with the corresponding addresses.
After that, the load balancer will evenly distribute the request to the two web servers.
You can also implement weighted round robin (e.g. with 2:3 ratio) by simply replacing the
invocation to resetLoadBalancer with:
1
2
3
....
resetLoadBalancer asIP1 2 asIP2 3
...
Similarly, if you provision a 3rd web/app server asIP3 and want to load balance with ratio 2:3:4, you should call:
1
2
3
...
resetLoadBalancer asIP1 2 asIP2 3 asIP3 4
...
Under the Cover
I will not go into the implementation details of the scripts, as I’ve already discussed most of it in the
previous post. In essence the
main_installer.sh script orchestrates the installation by transferring configuration
files and installation scripts to all VMs. On each VM the installation is performed by a separate bash script. These are:
client-setup.sh– executed on the client VM. Its log is redirected to~/client-setup.logon the installer machine.lb-setup.sh– executed on the load balancer VM. Its log is redirected to~/lb-setup.logon the installer machine.nfs-setup.sh– executed on the NFS server VM. Its log is redirected to~/nfs-setup.logon the installer machine.as-setup.sh– executed on the web/application server VM. Unlike the previous scripts, it mounts the filestore as a NFS volume, instead of hosting it locally. Its log is redirected to~/as-setup.logon the installer machine.db-setup.sh– executed on the DB VM. Its log is redirected to~/db-setup.logon the installer machine.
Common installation logic is still implemented in base-setup.sh and base-server.sh.
A lot of common and reusable functions are stored in functions.sh. The script as-image-start.sh is set to
automatically execute at boot time of the web/app server VM and starts the web server and NFS mounting.
A major problem in the set up of the load balancer was the stateful nature of the Olio workload. Olio maintains session data in the web server’s memory for every user. Thus requests from the same user have to be redirected by the load balancer to the same server (a policy known as sticky load balancing). Usually, this is achieved through a mechanism called ip-hashing, which essentially means that HTTP requests coming from the same IP address are redirected to the same web server. However, in CloudStone all requests originate from the faban driver/client and thus have the same source IP address.
That’s why we use the HAProxy load balancer. Unlike other load balancers (e.g. Nginx) it supports cookie-based load balancing. Upon session creation, the web server installs an identifying cookie in the client, which is later on used by the load balancer to dispatch the subsequent requests to the appropriate server.
References
Official installation documentation: