
Table of Contents
- Introduction
- Installation and Setup
- Terminology and Background
- Tasks
- Gradle Plugins (Example: Java)
- Dependency Management
- Gradle Wrapper
- Multi-Project Builds
Introduction
Gradle is a generic build tool which is very popular in the JDK world. Alternatives like ANT and Maven are purely imperative or declarative in nature and are specialised for the JDK. Gradle, on the other hand, hits a sweet spot by mixing declarative and imperative features and can be used to build non-JDK projects as well.
This post introduces Gradle, its main building blocks and features, and how to work with them.
Installation and Setup
SDKMAN is a wonderful utility for managing JDK environments and tools.
It’s similar to
Ruby’s RVM, Pythons PyEnv, and
Node’s NVM version managers. With SDKMAN, we can
install and switch between multiple versions of Java, Scala, Maven, Gradle, etc.
No longer do we need to modify PATH and redefine other environment vars!
To install on Linux or Mac:
1
curl -s "https://get.sdkman.io" | bash
For Windows, there’s a separate installation instruction on the website.
Assuming we have an existing JDK installation, we can install only Gradle with:
1
2
3
4
5
# Install the latest Gradle
sdk install gradle

# Install a spefic gradle version
sdk install gradle 3.0
SDKMAN has many other neat features, but we’ll leave them out of this discussion.
Terminology and Background
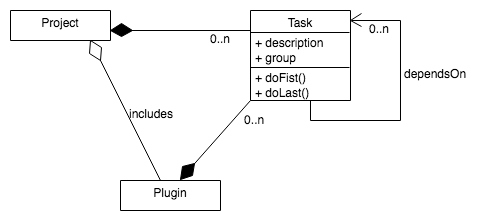
In Gradle, a folder of code and resources that is build to produce an artefact is called a project. In the most simple case, a project contains a series of tasks defining the various steps of building a project - e.g. compile, test, assembly. Tasks can depend on each other and thus form a dependency graph. Behind the scenes, Gradle keeps track of it and ensures that all tasks are run in the right order. It also keeps track of which tasks have changed since the last run. Thus, it can execute only the parts of the task graph which are affected by a changed task.
A task can have description and group properties and
two methods - doFirst and doLast.
As their names suggest, they are the first and last operations to run when a task
is started.
Working with tasks and their dependencies can be quite laborious and repetitive. We often use the same tasks in many projects - e.g. compile and test. Enter plugins. A plugin is a collection of tasks that can be imported/included into a project. There are a many community supported plugins for working with Java, Scala, JavaScript, and more - here is the catalogue.
Each Gradle project has a build.gradle file written in a
Groovy DSL.
Tasks
Task Definition
The DSL features several ways to define a task in the build.gradle file.
The most widely used syntax is:
1
2
3
4
5
6
7
8
9
10
11
// Define new task and its fields/methods - all of them are optional
task myNewTask {
  description 'This is my new Task'
  group 'tutorialTasks'
  doFirst {
    println 'Before ...'
  }
  doLast {
    println 'After ...'
  }
}
Now we can check what tasks are there:
1
2
3
4
5
# Displays tasks - custom and custom
gradle tasks

# Display ALL tasks - even ones without group or description
gradle tasks -a
And we can run a task:
1
2
3
4
5
6
# Run a single task.
# In this case, it'll run doBefore and doAfter in this sequence
gradle myNewTask

# Run a single task in "quite" mode - supresses some of Gradle's log
gradle -q myNewTask
Dependencies
Tasks can depend on each other thus forming a graph. Dependencies can be specified at the time of definition or they can be set afterwards. Let’s consider the following sample task dependency graph:
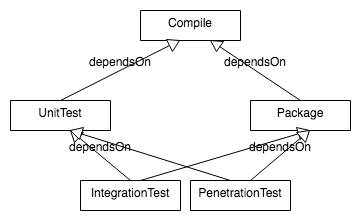
In the gradle.build file, this could be defined as:
1
2
3
4
5
6
7
8
9
10
11
12
13
14
15
16
17
18
19
20
21
22
23
24
25
26
27
28
29
30
31
32
33
34
35
// "Root" task - no dependencies
task CompileTask {
  doFirst { println "Compiling ..." }
  doLast { println "Compiling done!" }
}

task UnitTestTask {
  doFirst { println "Unit Testing ..." }
  doLast { println "Unit Testing done!" }
  // Define dependency "inline"
  dependsOn CompileTask
}

task PackageTask {
  doFirst { println "Packaging ..." }
  doLast { println "Packaging done!" }
}

// Define dependency after task initialisation
PackageTask.dependsOn CompileTask

task IntegrationTestTask {
  doFirst { println "Integration Testing ..." }
  doLast { println "Integration Testing done!" }
  // Define multiple dependencies "inline"
  dependsOn UnitTestTask, PackageTask
}

task PenetrationTestTask {
  doFirst { println "Penetration Testing ..." }
  doLast { println "Penetration Testing done!" }
}

// Define dependencies after task initialisation
PenetrationTestTask.dependsOn UnitTestTask, PackageTask
Now we can run the IntegrationTestTask with:
1
gradle -q IntegrationTestTask
One possible output is:
1
2
3
4
5
6
7
8
Compiling ...
Compiling done!
Packaging ...
Packaging done!
Unit Testing ...
Unit Testing done!
Integration Testing ...
Integration Testing done!
Gradle executed the tasks in an order which honours the task dependencies!
Moreover, CompileTask was run just once, although there are multiple “paths”
to it in the graph. PenetrationTestTask was not executed, because
the target task does not depend on it at all.
Note that in this example PackageTask ran before UnitTestTask.
It could have been the other around as well. Gradle does not guarantee
the order of task executions, if there are multiple possible orders
satisfying the task dependencies.
Typed Tasks (Example: Copy)
All tasks so far were not too useful and were not really reusable. Enter Typed Tasks, which can be parameterised with an instance of a given type.
Let’s take as an example the Copy type.
Here’s how we can copy a folder from one location to another without a few files containing sensitive data:
1
2
3
4
5
6
7
8
// A new task taking a "Copy" parameter
// Copy defines what attributes the task can have - in this case:
// from, into, exclude, etc
task copyFiles (type: Copy){
  exclude 'secret.xml', 'secret.json'
  from 'src'
  into 'dest'
}
Gradle comes with many predefined Typed Tasks for copying, packaging, documentation generation, etc. You just need to find the ones you need in the documentation.
Gradle Plugins (Example: Java)
Gradle plugins define a set of tasks, DSL extensions, and conventions which can be reused across projects. In this section, we will look at the Java plugin as an example.
The Java plugin adopts many of Maven’s conventions with respect to code structure. Your code should be structured like this:
1
2
3
4
5
6
7
8
9
10
project
├── build
├── build.gradle
└── src
    ├── main
    │   ├── java
    │   └── resources
    └── test
        ├── java
        └── resources
The build folder is a system folder and is analogous to target in Maven.
Gradle stores the compiled binaries in it.
To include/apply the Java plugin:
1
2
3
4
5
6
// Declare we'll use the Java plugin
apply plugin: 'java'

// An optional property used by the Java plugin
// Will be used to version our jars
version = '1.0.SNAPSHOT'
The plugin defines several new tasks (with dependencies between them) for managing the application:
1
2
3
4
5
6
# Check all the tasks the plugin gave us!
gradle tasks

# A "top" task which compiles, tests, and packages
# It creates a jar file in the ./build/libs folder
gradle build
What if we inherited a project that does not follow these conventions? No worries - Gradle allows us to define custom source sets:
1
2
3
4
5
6
7
8
9
10
11
12
13
14
15
16
17
18
19
20
21
22
23
24
apply plugin: 'java'

// Redefine where to look for app and test code
// In this example, our code is structured as:
// project
//   └── src
//       ├── main
//       │   ├── java
//       │   └── resources
//       └── test
//           ├── java
//           └── resources
sourceSets {
  main {
    java {
      srcDir 'src'
    }
  }
  test {
    java {
      srcDir 'test/src'
    }
  }
}
The default resulting jar file is not runnable/executable. Let’s fix that:
1
2
3
4
5
6
7
8
apply plugin: 'java'

// Configure the "jar" task of the Java plugin
jar {
    manifest {
        attributes 'Main-Class': 'com.classy.MyMainClass'
    }
}
Dependency Management
One of the main features of Maven is the management of library dependencies in terms of verions, lifecycle (compilation, test), and location (online repositories). Gradle offers pretty similar functionalities and even integrates with all maven repos.
Repositories
We can define our repositories in build.gradle with the
repositories command. For example, to use Maven
and jcenter repositories:
1
2
3
4
5
6
7
8
9
10
11
repositories {
  // Maven's default repo
  mavenCentral()

  // Custom Maven repo
  maven { url "http://maven.springframework.org/release" }

  // JCenter(https://bintray.com/bintray/jcenter)
  // Presumably performs better than Maven Central
  jcenter()
}
Dependency Definition
Now that we have library repositories, we can define some dependencies. Each library dependency can have a configuration responding to an application lifecycle stage - e.g. compilation or test.
The Java plugin defines 4 dependency configurations -
compile, runtime, testCompile, and testRuntime. They
mean exactly what their names suggest.
Any dependency defined with the compile or testCompile
configurations, is also “inherited” for the runtime and
testRuntime stages:
1
2
3
4
5
6
7
8
9
10
11
12
13
14
dependencies {
    // Maven repo dependency for "test":
    //  - group: 'junit'
    //  - artifactId/name: 'junit'
    //  - version: '4.10'
    testCompile group: 'junit', name: 'junit', version: '4.10'

    // We could also write:
    // testCompile 'junit:junit:4.10'

    // Local file 'compile'  and 'runtime' dependencies (no repo)
    compile files('libs/a.jar', 'libs/b.jar')
    runtime fileTree(dir: 'libs', include: '*.jar')
}
We can list/inspect a project’s dependencies with:
1
2
3
4
# All dependencies
gradle -q dependencies
# All compilation dependencies
gradle -q dependencies -- configuration compile
Caching
In a previous post, we saw how the Yarn package manager caches NPM modules to achieve higher speed. Gradle does the same. It caches all downloaded dependencies from all Gradle projects in a folder on the host machine. This significantly speeds subsequent builds and allows us to work offline.
We can refresh the cache with the option --refresh-dependencies:
1
2
# Build and ignore the cache
gradle --refresh-dependencies build
You can also delete the cache manually - it is located in ~/.gradle/caches.
Gradle Wrapper
Gradle is good at managing library versions, but how do we know that all team members and the CI server run the same Gradle version? Enter Gradle Wrapper (a.k.a. GradleW)!
To get started, let’s add a new Typed Task to our gradle.build
and configure it with the desired version:
1
2
3
4
5
6
7
// This typed task comes with Gradle
// No need to include a plugin
task wrapper(type: Wrapper) {

    // Define what gradle version we'll need
    gradleVersion = '2.6'
}
Now run the task:
1
2
# Run the gradle wrapper task to initialise GradleW
gradle wrapper
This will create the following files and directories:
1
2
3
4
5
6
7
.
├── gradle
│   └── wrapper
│       ├── gradle-wrapper.jar
│       └── gradle-wrapper.properties
├── gradlew
└── gradlew.bat
Now we can use ./gradlew (or gradlew.bat on Windows) instead
of the global gradle command. For example:
1
2
# Using Gradle Wrapper instead of just Gradle
./gradlew build
This will guarantee that the appropriate Gradle version is downloaded, installed, and all commands are run with it. Submit these files to your versioning system and all team mates and the CI server can be consistent.
Multi-Project Builds
So far, we saw how to work with projects that produce a single standalone artifact - e.g. a jar file. However, in practice a product can consist of multiple interconnected projects - e.g. micro services or a component model like OSGI. Such projects typically have many common dependencies and tasks, and can even depend on each other.
Gradle solves this problem by allowing for multi-project builds.
We need to place all projects in the same folder (a parent project).
We initialise this folder with two config files:
settings.gradle and build.gradle.
Within each individual project we have the standard build.gradle file
defining its own build behaviour.
The following diagram depicts the sample folder structure of a multi-project with 3 projects - ProjectA, ProjectB, and ProjectC
1
2
3
4
5
6
7
8
9
10
11
12
.
├── ProjectA
│   ├── build.gradle
│   └── ...
├── ProjectB
│   ├── build.gradle
│   └── ...
├── ProjectC
│   ├── build.gradle
│   └── ...
├── build.gradle
└── settings.gradle
The settings.gradle file enumerates the included projects:
1
include 'ProjectA', 'ProjectB', 'ProjectC'
The build.gradle file in the parent folder defines dependencies and
plugins which are common to all or subsets of the projects.
It also defines the dependencies between the projects:
1
2
3
4
5
6
7
8
9
10
11
12
13
14
15
16
17
18
19
20
21
22
23
24
25
26
27
28
29
30
// Common plugins, config, and dependencies for
// all projects - ProjectA, ProjectB, ProjectC
allprojects {
  apply plugin: 'java'

  version = '0.1-SNAPSHOT'

  repositories {
    jcenter()
  }

  dependencies {
    testCompile 'junit:junit:4.10'
    compile 'commons-logging:commons-logging:1.2'
  }
}

// Common to all projects except ProjectC
configure(subprojects.findAll {it.name != 'ProjectC'}) {
  dependencies {
    compile 'commons-logging:commons-logging:1.2'
  }
}

// ProjectA depends on ProjectB
project(':ProjectA'){
 dependencies {
   compile project(':ProjectB')
 }
}
Now we should be able to build individual projects from their folders and all projects from their parent folder.