
Table of Contents
Introduction
React is one of the most mature and widely used JavaScript libraries. However, the ecosystem of tools around it can be overwhelming. It often takes hours or even days to configure properly a usable development environment. Taking it all to production with a working continuous delivery pipeline can take even longer!
In this post, we’ll show how to set up a sample React web app and productionise it in less than 10 minutes by using Bluemix Toolchains, a community Cloud Foundry boilerplate, and Facebook’s latest React tooling.
More React, Less Boilerplate
Setting up a React environment has always been laborious. Facebook has released a new tool called Create React App which abstracts the underlying tools like Webpack, Babel, ESLint, Flow, etc.
To start a new react project:
1
2
3
4
5
6
7
8
# Install the tool globally
npm install -g create-react-app

# Create a new app "sample-react-app"
create-react-app sample-react-app

# Download all dependnecies
cd sample-react-app && npm install
Now we should have the following file structure
(excluding node_modules):
1
2
3
4
5
6
7
8
9
10
11
12
13
.
├── README.md
├── package.json
├── public
│   ├── favicon.ico
│   └── index.html
└── src
    ├── App.css
    ├── App.js
    ├── App.test.js
    ├── index.css
    ├── index.js
    └── logo.svg
Create React App
assumes that all JavaScript and CSS code and the resources are in the
src folder. You can directly import the style sheets and the images
from the JS files. By default, all sample files are stored directly
in src, but you can reorganise it into subfolders as you see fit.
The tool does not impose any specific code structure
because there are many conventions. For example, if you use
Redux you may have subfolders for actions
and reducers or you may want to separate dummy components and containers
in their own folders. Create React App
gives you the choice to organise your code within src.
Note that there are no separate test and assets folders. I assume
this is to encourage developers to keep things together and avoid
maintaining long and brittle relative-path import statements.
The only other folder is public. It just holds the template
index.html which defines a div with id root. The sample application
renders the React components within it.
There are no Webpack and Babel config files. Everything is
“hidden” behind several NPM scripts defined in package.json. If we
explore package.json, we’ll see the reference to the development
scope dependency react-scripts. This is where the magic happens.
These scripts provide wrappers and default parameters to the underlying
tools and shims.
This is already a functioning application and we can use it as follows:
1
2
3
4
5
6
7
8
9
10
11
12
13
14
# Start the app in "Dev" mode
# Automatically reloads on changes
npm run start

# Run the tests and watch for changes
# Re-run on every changes
npm run test

# Run the test just once - in "CI mode"
CI=true npm run test

# Build production ready minimised and optimised
# HTML, CSS, and JS files. Result is in the "build" folder
npm run build
The documentation details how to add additional commands for Flow, ESLint, etc.
We now have a completely functional React app and we can go on to add our own dependencies, components, and logic. Create React App does not add Redux, Router, Bootsrap, and other popular libraries and it’s up to us to configure them.
The npm run start command starts the app in a development server that
serves its static content without any additional logic.
However, in production we may
deploy a BFF API endpoint on the same server.
This can be replicated in development environment by redirecting the
API calls with a reverse proxy, as per
this post .
Create React App is suitable for most small and medium size apps.
However, sometimes we may find ourselves restrained by the
default configurations. If we want to configure ourselves the
underlying tools, we can use the npm run eject command.
It will remove the dependency on react-scripts and will
place in the project folder the functionally equivalent dependencies
and configurations of the underlying tools.
To the Cloud
Now that we have a running React app, how do we productionise it?
Well, first things first - lets put our code on GitHub.
Go to GitHub and create a project with the same name as your
React app - e.g. sample-react-app. Now you can push
your code to it:
1
2
3
4
5
6
7
8
9
10
# Initialise a local repo
git init
git add .
git commit -m "App skeleton"

# Add the remote GitHub repo
git remote add origin git@github.com:[user-name]/[app-name].git

# Push the code - may need authentication
git push origin
If you don’t already have a Bluemix account, you can sign up for a 30 day trial here. Bluemix allows you to divide and manage your Cloud resources into organisations and spaces. Here is how you can create an manage them. You don’t need to be know Cloud Foundry to follow this post, but if you’re interested this article. provides a succinct overview of Bluemix/Cloud Foundry concepts.
The easiest way to get up and running is to use Bluemix toolchains. A toolchain is a collection of tools (GitHub, Slack, CI, Web IDE, Monitoring tools, etc.) which are integrated and let you to manage your application and its life cycle. Bluemix allows you to build your own toolchains, or to use a set of predefined toolchain templates. Templates are much faster to use and they encompass typical scenarios and architectures.
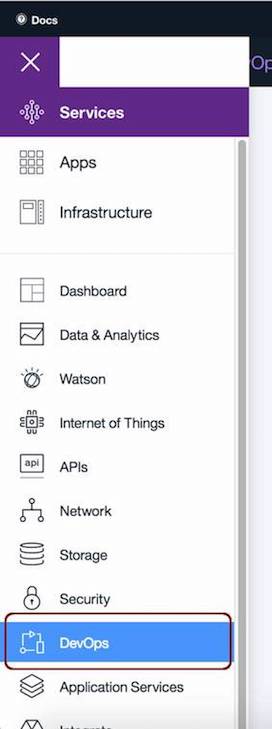
In this post, we will use a toolchain template to kick start our application on the cloud. In the Bluemix web portal, select the hamburger navigation button and select “DevOps”:
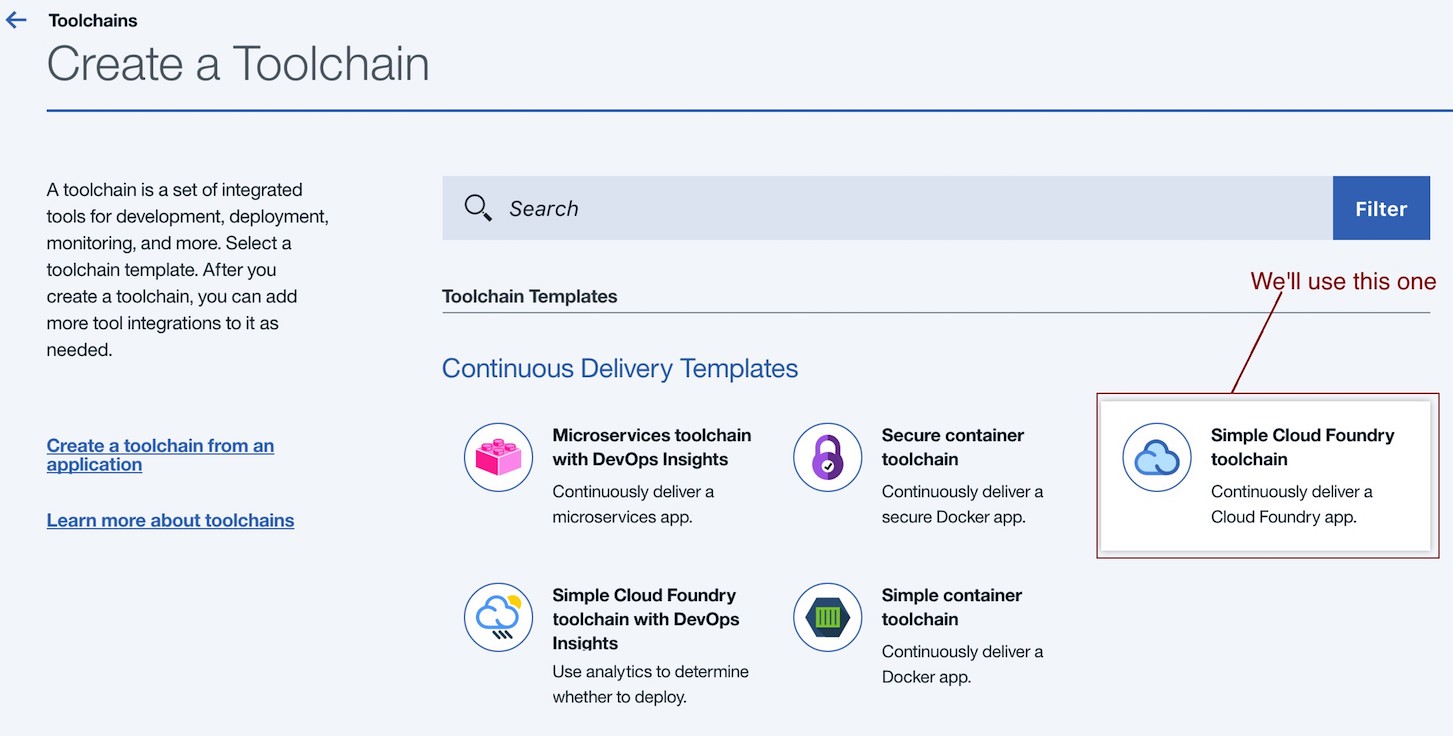
Select “Get Started” and then the “Simple Cloud Foundry Toolchain”:
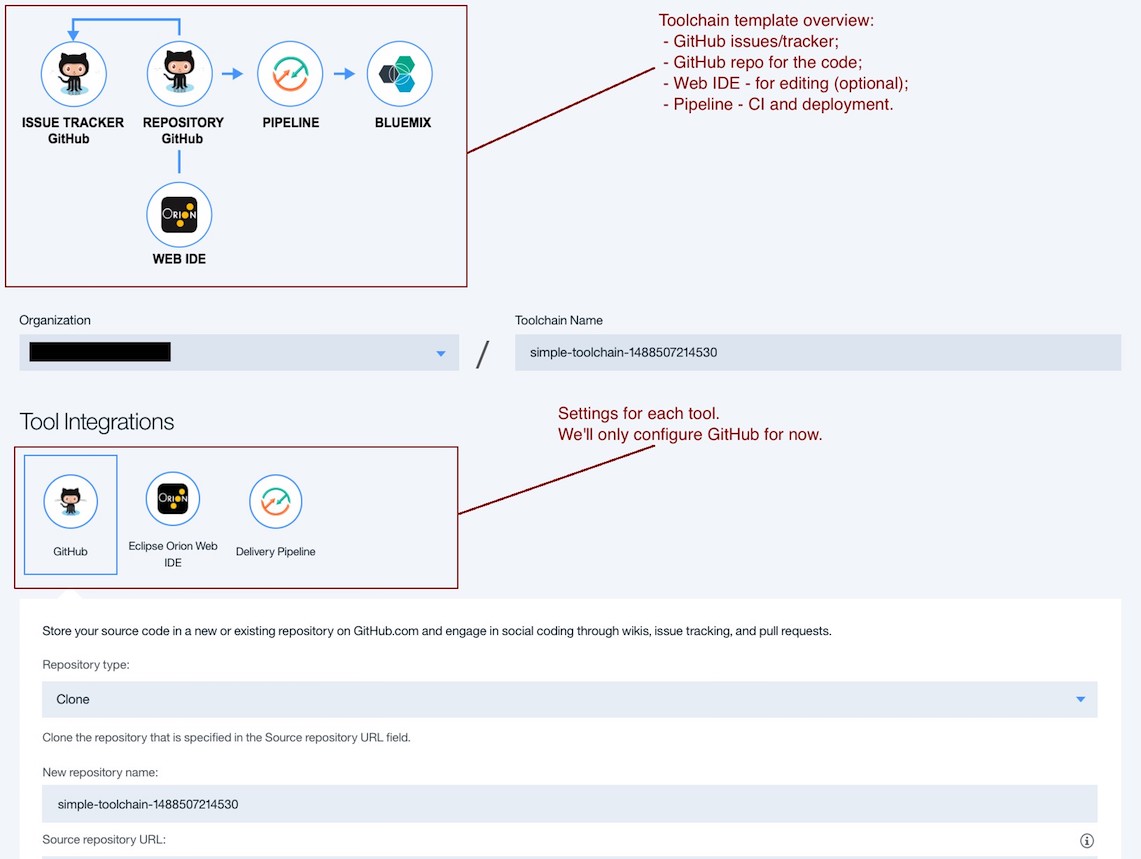
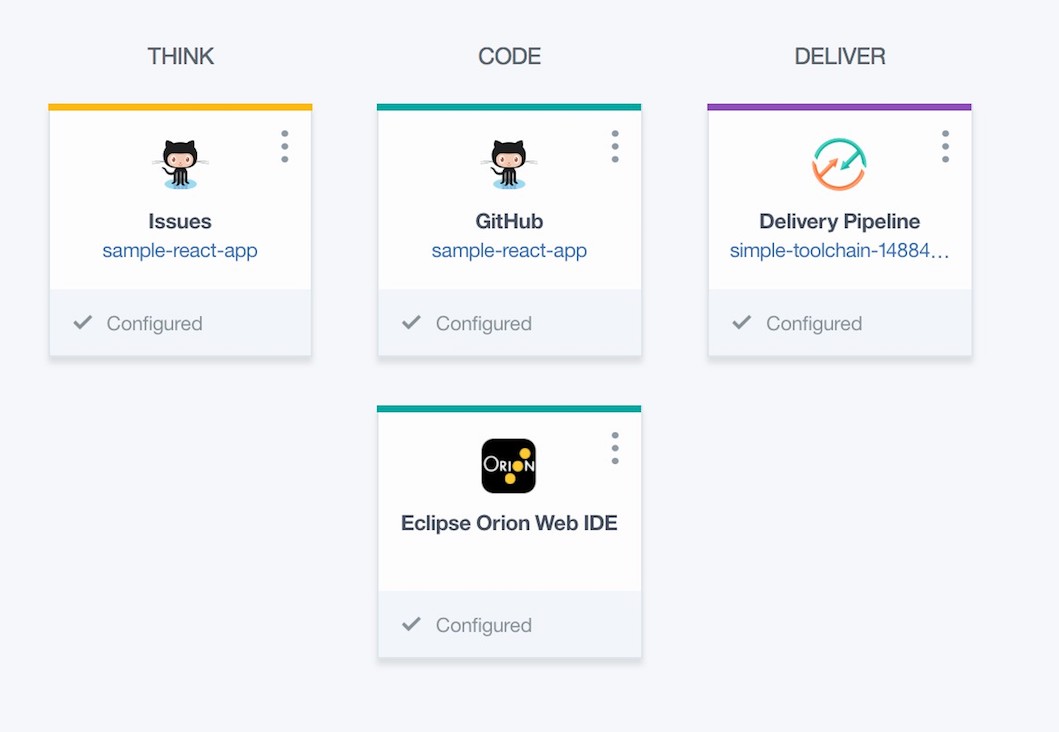
This toolchain integrates 3 tools - GitHub, Web IDE, and a delivery Pipeline. GitHub hosts the code and the issues. The Web IDE allows you to develop, test, and commit code. You don’t need to use it if you don’t like it - you can still write the code locally and push it to GitHub. It’s every useful for demos or when you don’t have your dev laptop handy. The Pipeline tool allows you to build CI, which tests your code, builds, and ships.
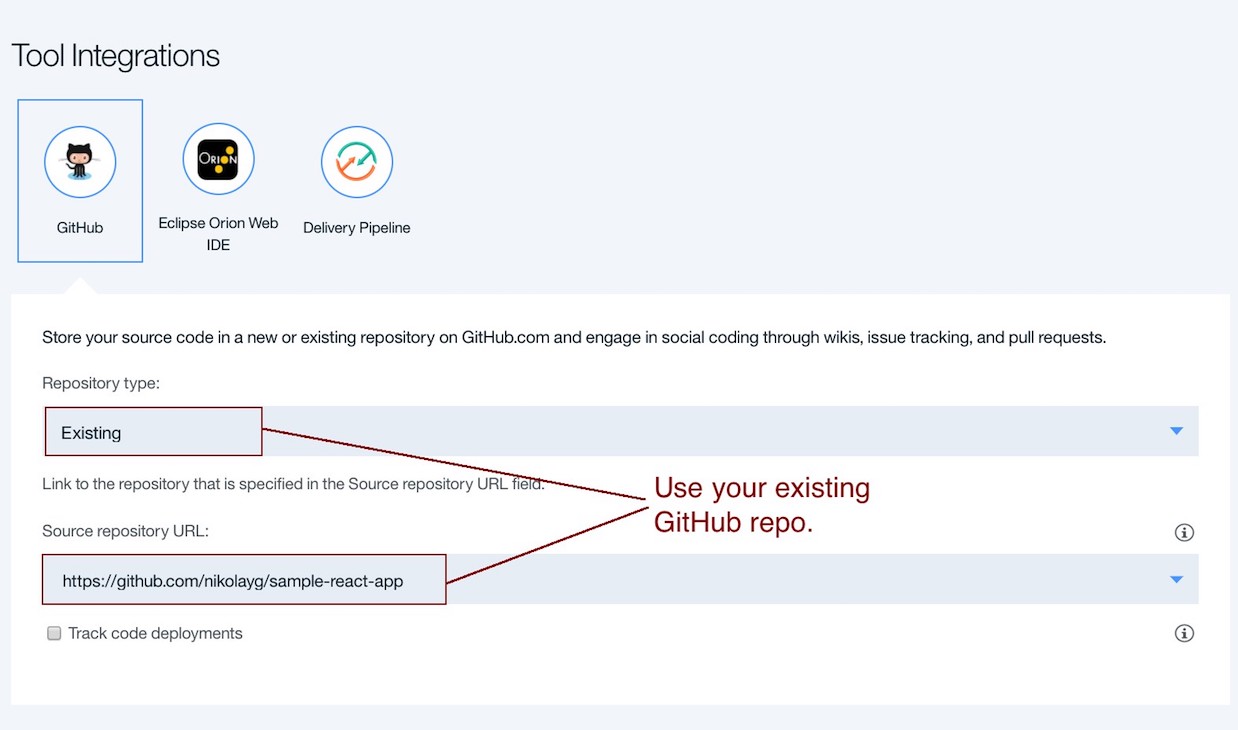
In this screen, we can edit the GitHub config. If you haven’t done so, connect the tool with your GitHub account. Now, from the drop-downs select “Repository type: Existing” and the URL of the repository you just created:
We’ll configure the rest of the tools later on. Go ahead and press “Create”. Now we should have a toolchain like this one.
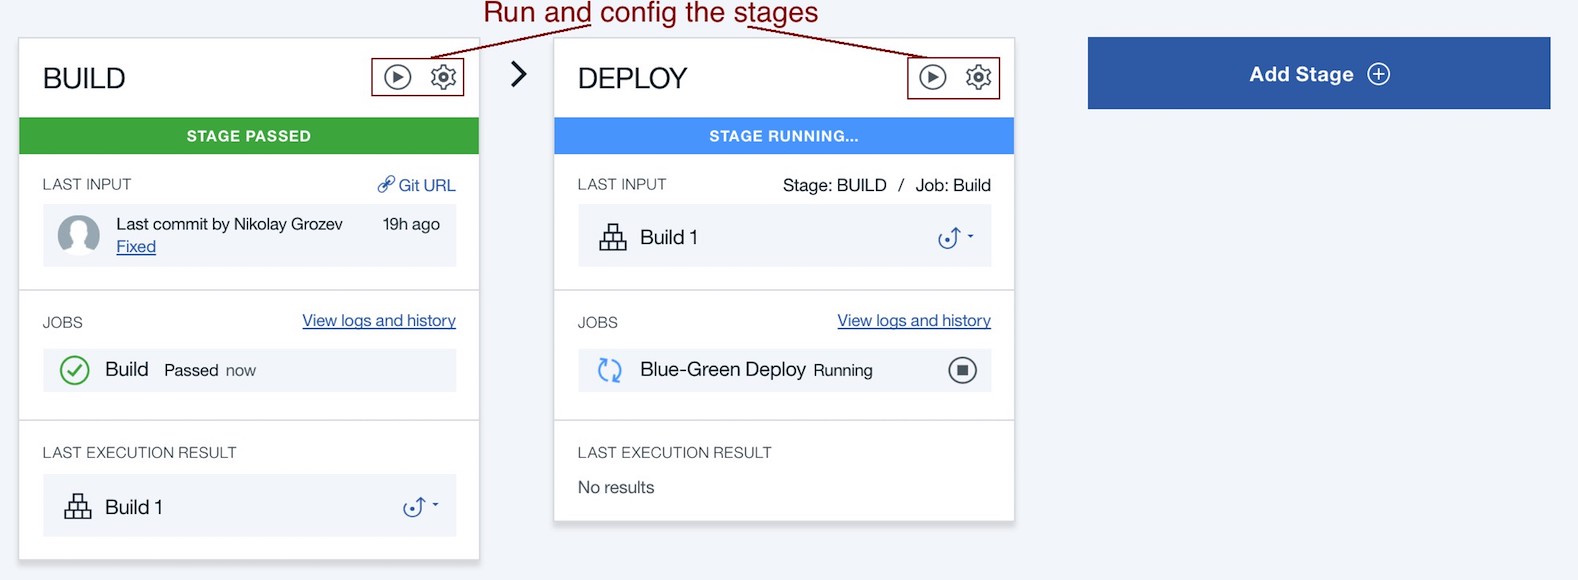
Our GitHub integration is already complete so now we should configure the CI pipeline. Click on the Delivery Pipeline and you should have 2 predefined stages - “Build” and “Deploy”.
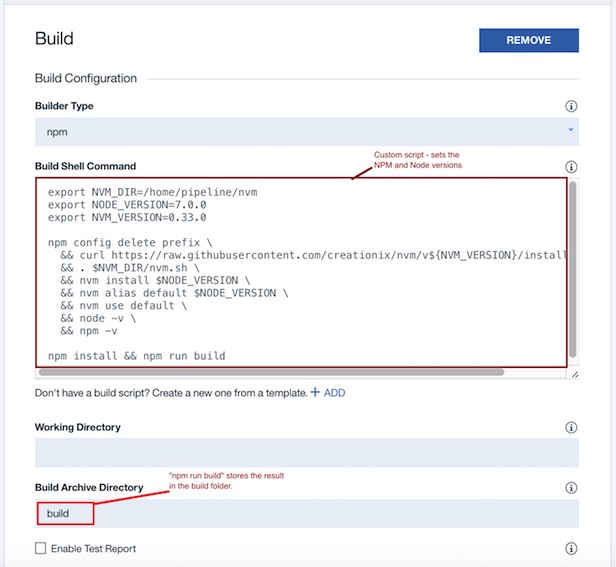
Let’s configure the “Build” stage first. Select the cog/options menu and then “Configure Stage”. By default we have only one job in this stage called “Build”. Let’s change its “Builder Type” to “npm”. In the “Build Shell Command” we need to specify the script to build the code. Unfortunately, for the time being the pipeline supports only NodeJS 4.2.2 and earlier. The fix is to set up our own versions of Node and NPM. All in all, the build script should look like this:
1
2
3
4
5
6
7
8
9
10
11
12
13
14
15
16
# Set up required version of Node and NPM
export NVM_DIR=/home/pipeline/nvm
export NODE_VERSION=7.0.0
export NVM_VERSION=0.33.0

npm config delete prefix \
  && curl https://raw.githubusercontent.com/creationix/nvm/v${NVM_VERSION}/install.sh | sh \
  && . $NVM_DIR/nvm.sh \
  && nvm install $NODE_VERSION \
  && nvm alias default $NODE_VERSION \
  && nvm use default \
  && node -v \
  && npm -v

# Install & build
npm install && npm run build
The npm run build will create a build folder, just like when
we run it locally. Hence, we need to specify it in the
“Build Archive Directory” field, so that it is passed to the next
stage. At the end, the “Build” job should like this:
This job will prepare/build the production deployment artefact, but how about
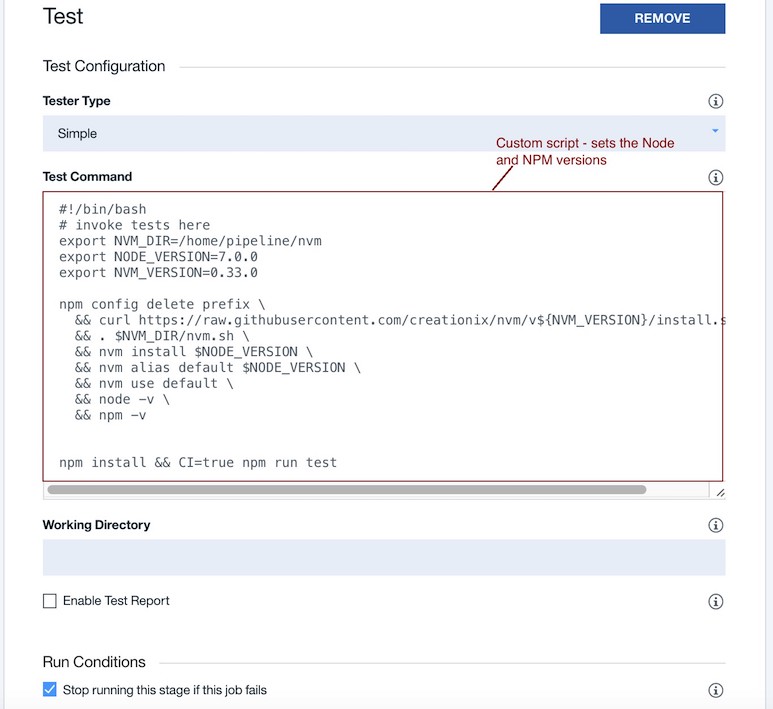
testing? To incorporate tests, we need to add a new job (via the “ADD JOB”
button). Select “Test” as the new job type. In the “Test Command” field
we need to provide the script which runs our unit tests. As a first step,
we need to set up once again the proper versions of Node and NPM. Then we can run
npm run test. As discussed, by default the Create React App test script
runs in a loop, so we need to run it in CI mode. The final script should be:
1
2
3
4
5
6
7
8
9
10
11
12
13
14
15
16
#!/bin/bash
# Set up required version of Node and NPM
export NVM_DIR=/home/pipeline/nvm
export NODE_VERSION=7.0.0
export NVM_VERSION=0.33.0

npm config delete prefix \
  && curl https://raw.githubusercontent.com/creationix/nvm/v${NVM_VERSION}/install.sh | sh \
  && . $NVM_DIR/nvm.sh \
  && nvm install $NODE_VERSION \
  && nvm alias default $NODE_VERSION \
  && nvm use default \
  && node -v \
  && npm -v

npm install && CI=true npm run test
The full configuration of the “Test” job follows:
As mentioned, “Create React App” allows easy integration with Flow and ESLint. Hence, we can define a new step/job for code analysis which is analogous to the “Test” job. We’ll skip this here, but feel free do it as an exercise.
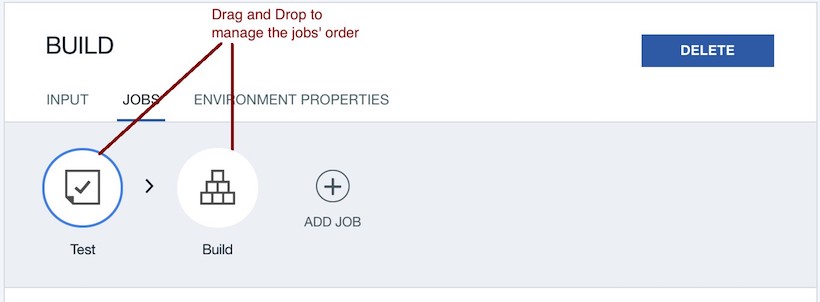
Finally, we can re-order the “Build” and the “Test” jobs. It doesn’t make sense to build when the tests are failing. Let’s just drag and drop “Test” in front of “Build”:
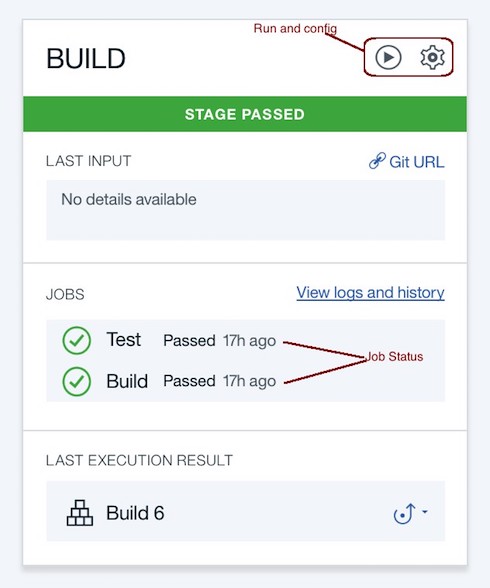
Now we can go back to the pipeline and run the “Build” stage via the the play/arrow button. If everything is OK, within a few minutes the stage and its jobs will turn green and indicate success:
So far so good! Now let’s configure the “Deploy” stage. Click on its options/cog button and select “Configure Stage”. The stage has a single job called “Blue-Green Deploy”. The used toolchain template came with a Cloud Foundry script implementing the Blue-Green deployment pattern. It takes as input the result of the “Build” job from the previous stage and (re)deploys a Cloud Foundry app with it.
The only missing part is the Cloud Foundry boilerplate. If you’re unfamiliar with Cloud Foundry, a boilerplate is an execution environment for your code - e.g. a Java or NodeJS web server. If we don’t specify a boilerplate, Bluemix will try to guess which of the system boilerplates can run our code. In this example, our code (i.e. output of the Build job) is a bunch of static HTML, JavaScript, and CSS files and a few images.
For simplicity, we would like to serve these as static web content. This is in fact a typical use case for React and SPA apps. The web content is served statically (e.g. from Object Storage) and the JavaScript code running in the browser is responsible to connect to the proper back end system at runtime. Unfortunately, none of the system buildpacks can serve static content out of the box. Luckily, there is a community provided buildpack which does.
We need to modify the deployment script to use this buildpack instead.
This is very easy, we just need to replace every Cloud Foundry
push expression cf push $CF_APP with a reference to the new buildpack:
1
2
# Use instead of "cf push $CF_APP", use the following
cf push $CF_APP -b https://github.com/cloudfoundry-community/staticfile-buildpack.git
The final modified script is:
1
2
3
4
5
6
7
8
9
10
11
12
13
14
15
16
17
18
19
20
21
22
23
24
#!/bin/bash
# Push app
if ! cf app $CF_APP; then
  cf push $CF_APP -b https://github.com/cloudfoundry-community/staticfile-buildpack.git
else
  OLD_CF_APP=${CF_APP}-OLD-$(date +"%s")
  rollback() {
    set +e
    if cf app $OLD_CF_APP; then
      cf logs $CF_APP --recent
      cf delete $CF_APP -f
      cf rename $OLD_CF_APP $CF_APP
    fi
    exit 1
  }
  set -e
  trap rollback ERR
  cf rename $CF_APP $OLD_CF_APP
  cf push $CF_APP -b https://github.com/cloudfoundry-community/staticfile-buildpack.git
  cf delete $OLD_CF_APP -f
fi
# Export app name and URL for use in later Pipeline jobs
export CF_APP_NAME="$CF_APP"
export APP_URL=http://$(cf app $CF_APP_NAME | grep urls: | awk '{print $2}')
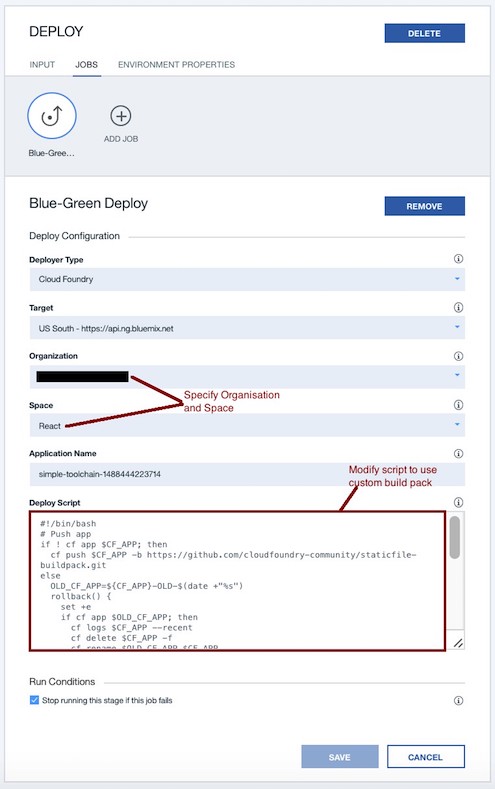
We just had to modify 2 expression (lines 4 and 19). The rest of the template came from the toolchain template. Here is what the final configuration looks like:
That’s it! Now we can go back to the pipeline page and run the “Deploy” stage. It should deploy the React app. Any future change to the GitHub repo will cause the the “Build” stage to re-run and if successful the “Deploy” stage will execute as well. The final pipeline is depicted below.

Clicking on the execution result will take us to the sample React app:

Conclusion
We saw how to kick start a sample React app, build a local development environment, and productionise it in less than 10 minutes! Now, we can replicate the toolchain to create a staging/test environment. We can continue to code our application without frill.
This is actually a good starting point for more advanced features. How about server side rendering? We just need to replace the community buildpack with a NodeJS buildpack and provide the NodeJS server file. Web sockets and backend APIs? We just need to “bake” the endpoints in the JavaScript and it can make dynamic calls to our back end.